A native guide to the atop command in Linux
The atop command is an essential Linux tool for monitoring system resources. It provides extensive information about process-level load on the system’s resources. Mastering this utility can bring countless benefits to the user.
To start with, we need to install the atop command on the system. Debian/Ubuntu users can accomplish this by:
sudo apt install atop
Other users of Linux have the option to utilize their usual package manager, and then search for the term ‘atop’.
This directive can exhibit various sensitive system-related details. To avoid any data obfuscation, we can acquire enhanced privileges by utilizing either ‘sudo su’ or ‘sudo -s’. We possess exhaustive documentation regarding sudo.
The fundamental outcome of the atop Command.
To easily view the utilization of system resources at the process level, one option is to execute the ‘atop’ command in the terminal.
atop
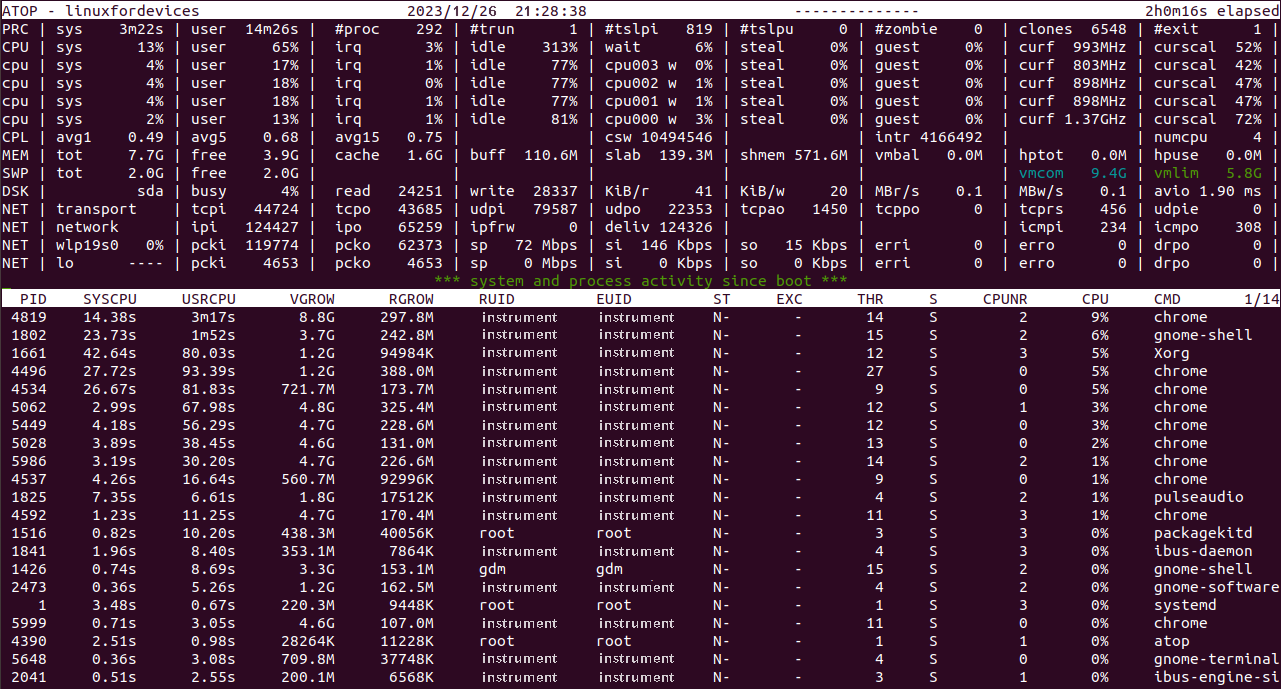
Let’s take a look at the layout, which is divided into two panels. The top panel shows the overall use of the system’s resources, while the bottom panel provides detailed information about each individual process.
The atop command provides cumulative statistics.
Each item in this perspective concentrates on a specific system resource.
1. Statistics related to the process.
- PRC – stands for “process”.The first two values are the time consumed by the ‘sys’ (system) and ‘user’ processes.
It is followed by the total number of processes as ‘#proc’.
The next value is the number of threads currently running in the system. (‘#trun’)
‘#tslpi’ denotes the number of threads that are currently sleeping and interruptible.
‘#tslpu’ denotes the number of threads that are currently sleeping and uninterruptible.
The following value is the number of zombie processes.
Next up is the number of clone system calls.
The last value is the number of processes that ended during the elapsed time. (‘#exit’)
2. Statistics pertaining to performance.
- CPU – relates to CPU utilization.The first two values show the percentage utilization of all the cores by the system and user processes.
The percentage of CPU used for interrupt requests. (‘irq’)
The next value is the idle percentage for all the cores combined.
The following value denotes the waiting each CPU core had to do.
Next up is the percentage for the steal time.
‘guest’ denotes the guest-percentage, which is the CPU time spent on other virtual machines.
The last two values indicate the current frequency of the CPU. - Now, the ‘atop’ displays the above statistics for each core independently.
- CPL – refers to as CPU Load.The first three values are the average loads with different periods: 1, 5, and 15 minutes.
This is followed by the number of context switches (‘csw’)
Next up is the number of interrupts (‘intr’)
The last value is number of available CPUs.
3. Statistics pertaining to memory.
- MEM – Memory UtilizationThe total physical memory supported.
The memory currently free.
The current cache memory.
‘buff’ as in “buffer” is the amount of memory consumed in filesystem meta-data.
The sum of memory for kernel’s memory allocation shown as ‘slab’.
The amount of shared memory.
- SWP – Swap Memory.
3. Statistics related to disks.
- DSK – Disk usageThe first value denotes the percentage of time the system is busy handling requests.
The reading requests issued.
The writing requests issued.
The rate at which data (in KB) is read per reading request.
The rate at which data (in KB) is written per writing request.
The next two values are time rates for reading and writing on the disk in Megabytes.
The last value is the average number of milliseconds spent in handling requests.
4. Statistics pertaining to networks
- NET – Network Statistics at the Transport Layer’transport’ signifies the Transport layer in Networking, which deals with the data protocols.
The number of segments received by the system following the TCP protocol. (‘tcpi’)
The number of segments transmitted. (‘tcpo’)
The similar statistics for UCP protocol. (‘udpi’ for UDP in) and (‘udpo’ for UDP out).
‘tcpao’ is the number of active TCP open connections.
Opposite to previous ‘tcppo’ is the number of passive TCP connections, but still open.
The figure of TCP retransmissions as ‘tcprs’.
The figure of UDP input errors as ‘udpie’. - NET – Network Statistics at the Network Layer’network’ signifies the Network Layer, which deals with Internet Protocols, IPv4 and IPv6 combined.
The number of IP packets received by the network interfaces. (‘ipi’)
The number of IP packets transmitted out from the interfaces. (‘ipo’)
The quantity of IP packets forwarded to other interfaces. (‘ipfrw’)
The quantity of IP packets delivered. (‘deliv’)
The last two entries are the number of ICMP packets received and transmitted by the network interfaces. - The following lines refer to each active network interface.The first value is the name of the network interface, like ‘wlp19s0’.
The following two packets are the number of packets that were received and transmitted through the particular interface. (‘pcki’ and ‘pcko’)
The network speed in Megabits (Mbps) as ‘sp’.
The rate at which bits are received and transmitted per second. (‘si’ and ‘so’)
The number of errors in packets received and transmitted. (‘erri’ and ‘erro’).
The last two values are the dropped packets in both ways. (‘drpi’ and ‘drpo’)
The explanation of the top panel of the atop command is now completed.
Resources allocated to each individual process in a system
It is important to note that the values in the ‘atop’ command continually update at specific time intervals.
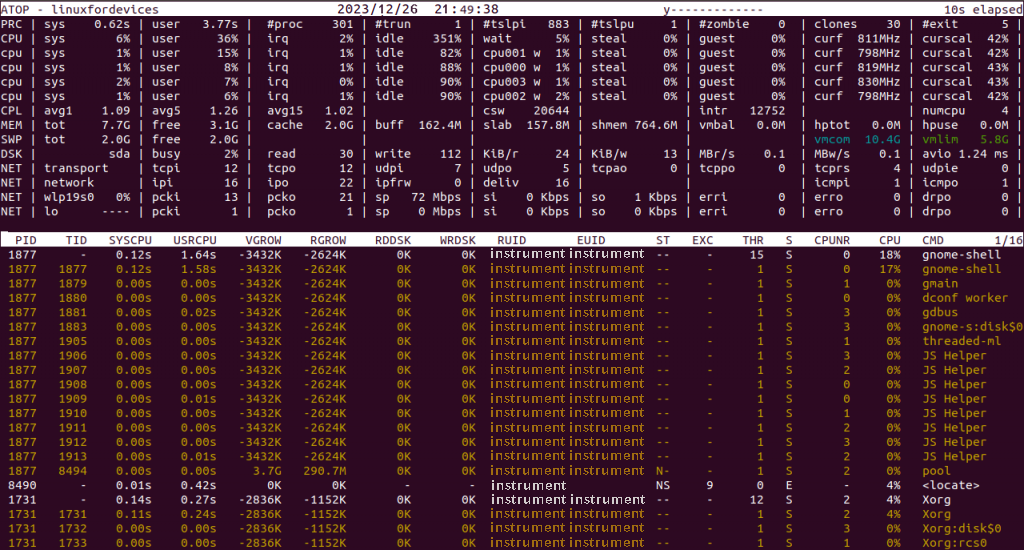
For every process entry, the ‘atop’ command’s generic output shows these specific details:
- PID – The process ID.
- SYSCPU – The amount of CPU consumed by the process while system handling.
- USRCPU – The amount of CPU consumed by the process, during its running in user mode.
- VGROW – The amount of virtual memory that the process has occupied since the last value update.
- RGROW – The amount of resident (physical) memory grown since last value update.
- RDDSK – The size of data transferred during disk reads.
- WRDSK – The size of data transferred during disk writes.
- RUID – The real user ID under which the process is being executed.
- EUID – The effective user ID under which the process is being executed.
- ST – The current status of the process.
- EXC – The exit code after the process terminates
- THR – The number of threads within the process.
- S – The current status of the primary thread of the process.
- CPU – The percentage of CPU utilization of the entire process.
- CMD – The name of the process.
The processes are arranged according to their CPU usage percentage in this general output. In this specific output, we receive limited information about each system resource type.
We should attempt to analyze information at the process level for every type of system resource.
The output generated by the atop command based on memory usage.
By utilizing the ‘atop’ command, we have the chance to examine the memory usage of every process operating in the system. This can be achieved by executing the following command:
atop -m
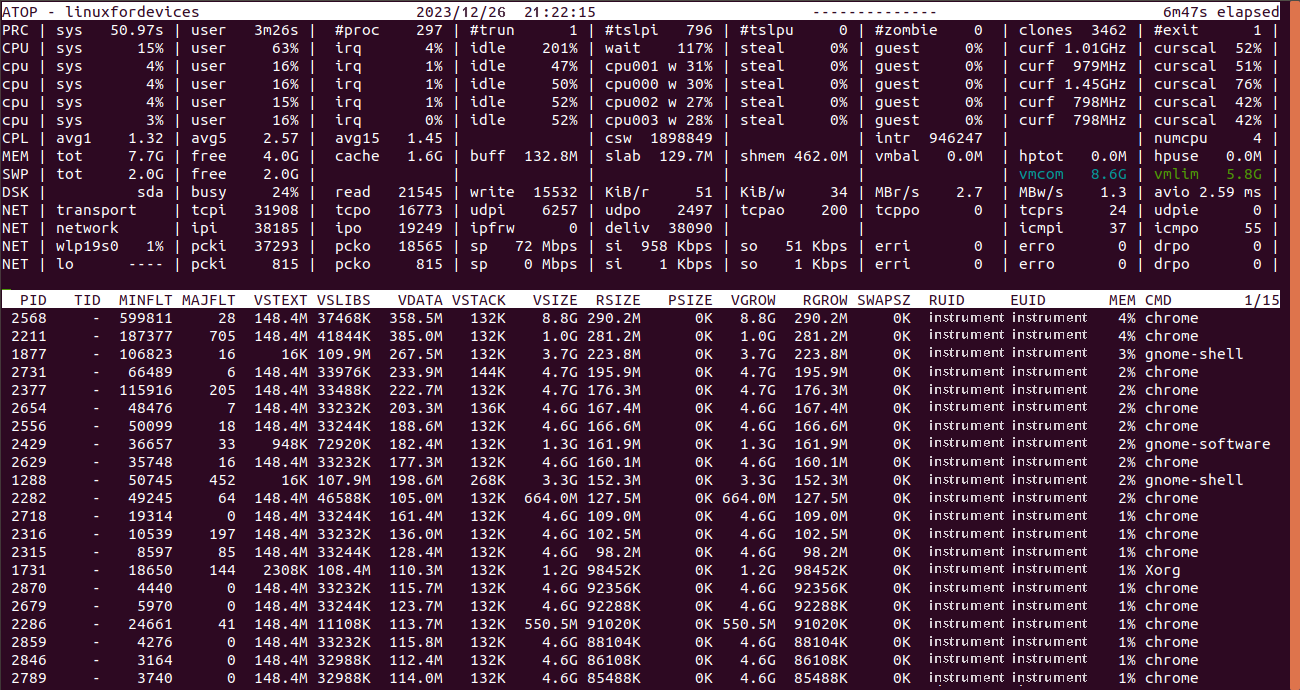
As evident, the upper panel remains unchanged even after adding the memory option, ‘-m’. Let’s now comprehend the columns for every process entry.
- PID – The process ID.
- TID – The thread ID.
- MINFLT – The number of minor page faults that have been solved by accessing data from free pages.
- MAJFLT – The number of major page faults that have been solved by especially retrieving data from disk.
- VSTEXT – The virtual memory occupied by the process text.
- VSLIBS – The virtual memory occupied by the shared libraries of the process.
- VDATA – The virtual memory size of the private data of the process.
- VSTACK – The virtual memory size of the private stack of the process.
- VSIZE – The total virtual memory size of the process.
- RSIZE – The total resident memory occupied by the process.
- MEM – The percentage of RAM consumed by the process.
The ‘MEM’ column determines the sorting order of the processes.
As ‘atop’ is an interactive command utility, we can modify the columns directly within the program. To access memory-specific output, we simply need to enter ‘m’ while ‘atop’ is displaying information in the terminal.
Generating output specific to a disk by utilizing the atom command in Linux.
We can utilize the ‘-d’ option in conjunction with the ‘atop’ command to gather disk usage information.
atop -d
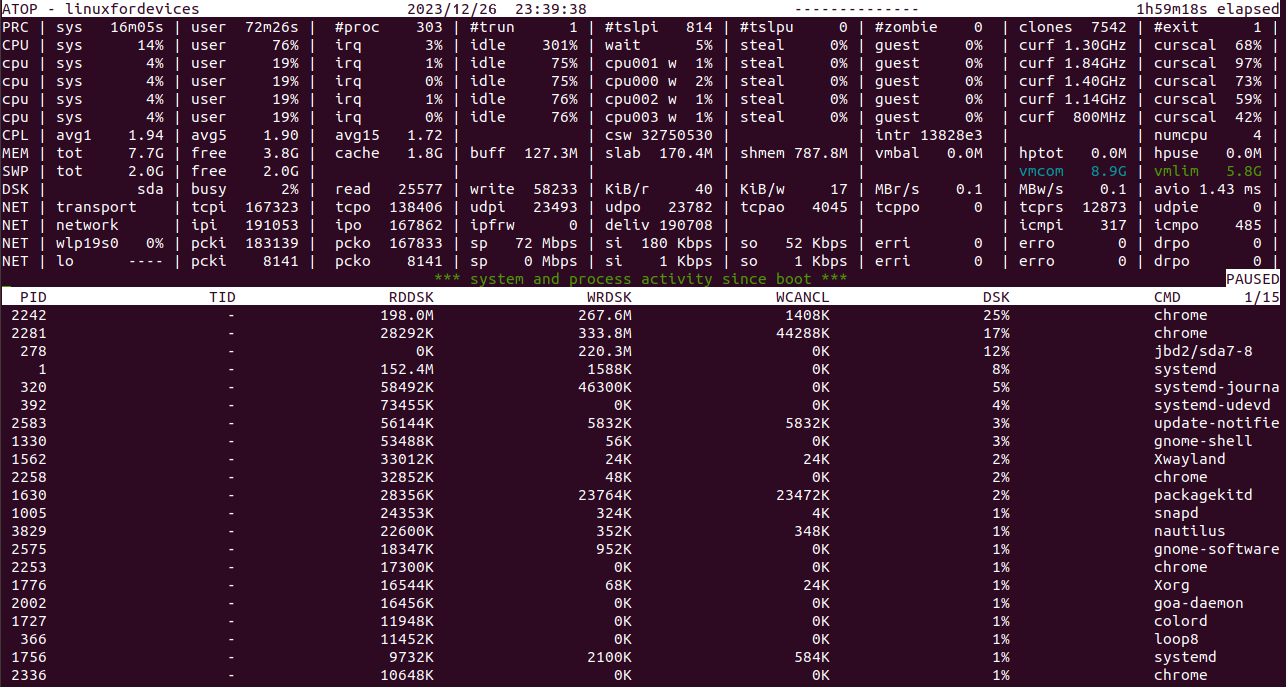
In the output that specifically refers to the disk, there isn’t much noteworthy information. However, a couple of significant observations are:
- RDDSK – The size of data transferred during disk reads.
- WRDSK – The size of data transferred during disk writes.
- WCANCL – The size of data initially written, but later withdrawn
- DSK – The percentage of Disk occupied.
- CMD – The name of the process.
It is important to mention that the processes are organized according to the ‘DSK’ column.
Discover Background Processes using the atop command.
The information presented to us in the command line output format is a list of the commands running in the background as processes.
atop -c
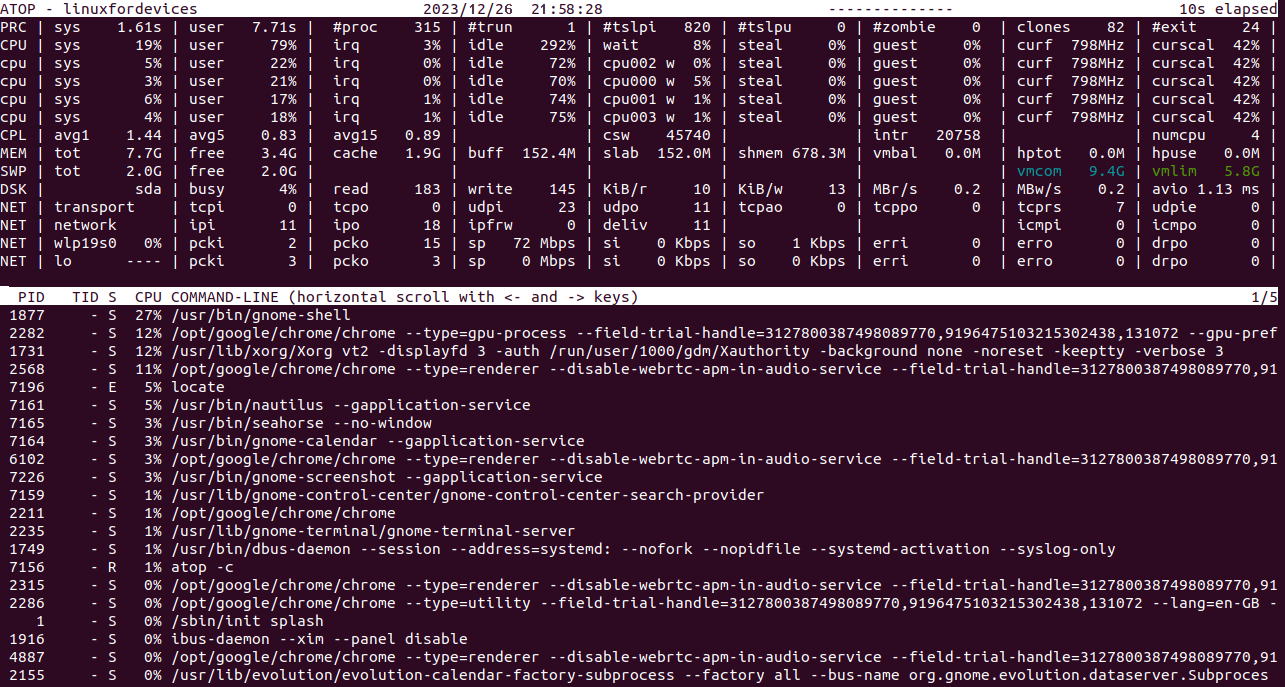
You can rerun the same process by copying and pasting the lines from the command line column. This output provides us with the precise command that was executed in the background to start the process.
Information organized in a thread-based format.
In addition to examining process data, the atop command allows for monitoring resource usage at the thread level. To view this information, we have two options:
atop -y
Simply press the ‘y’ key if the command is already showing system resource information.
It is evident that there have been no modifications to any of the columns related to system resources. The only addition is the thread count for each corresponding process.
Other random details
The ‘atop’ command provides a variety of information that can be extracted, and among the helpful ones are:
Discovering the commencement moments of processes.
2. Locate the initiations of processes.
3. Identify when processes begin.
4. Uncover the starting times of processes.
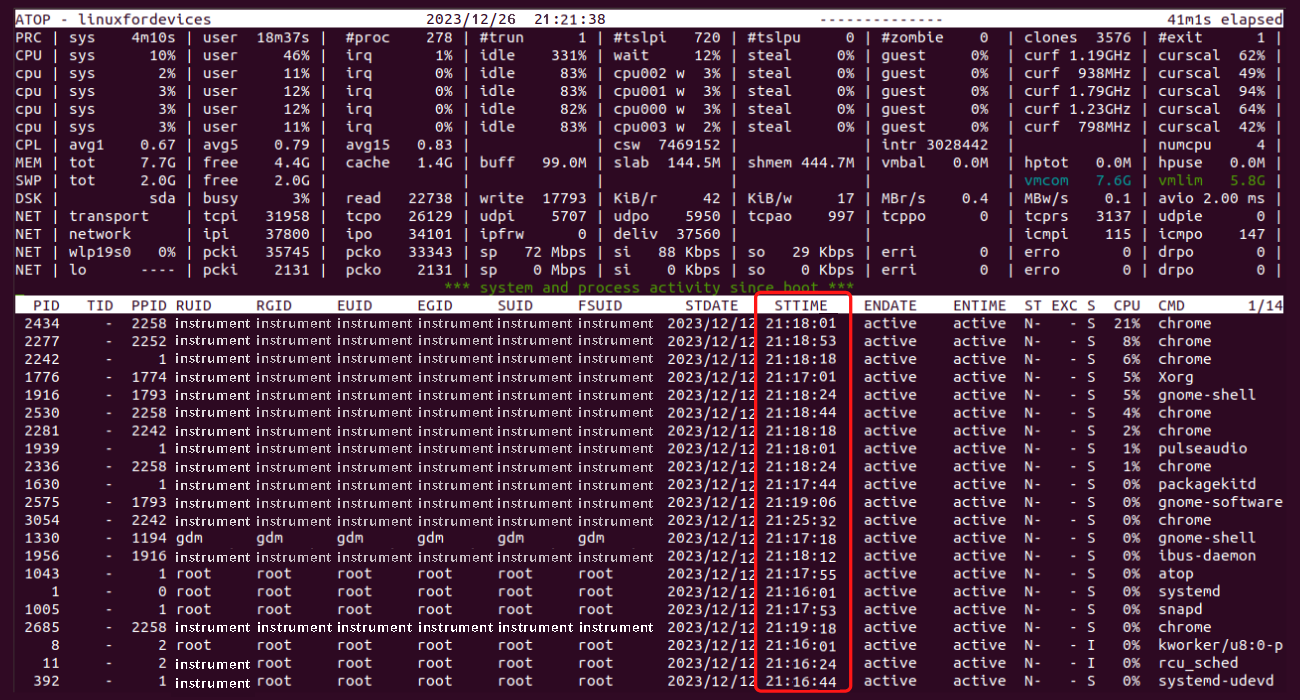
By utilizing the ‘-v’ option, we can obtain the attributes of the process.
atop -v
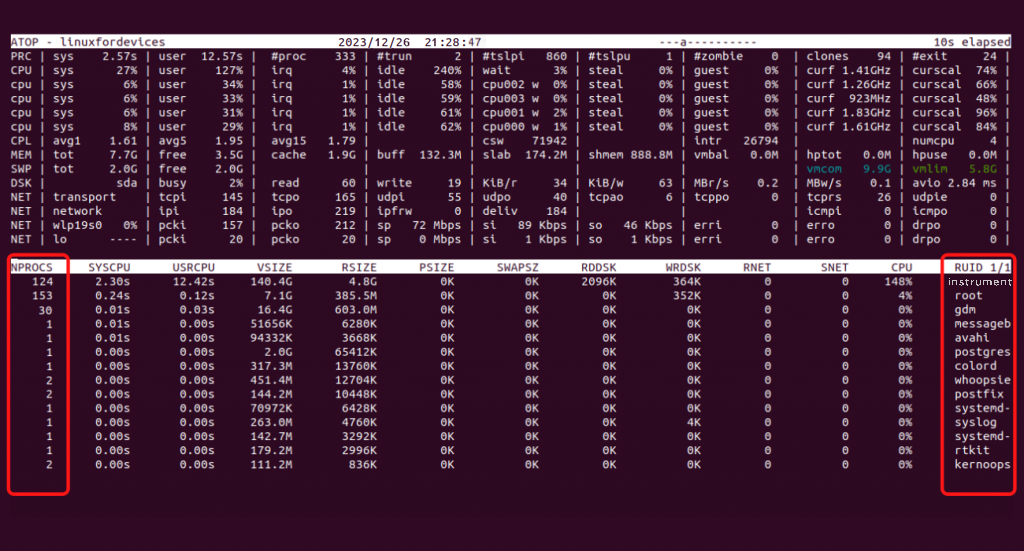
2. Count of the system’s processes per user.
atop -au
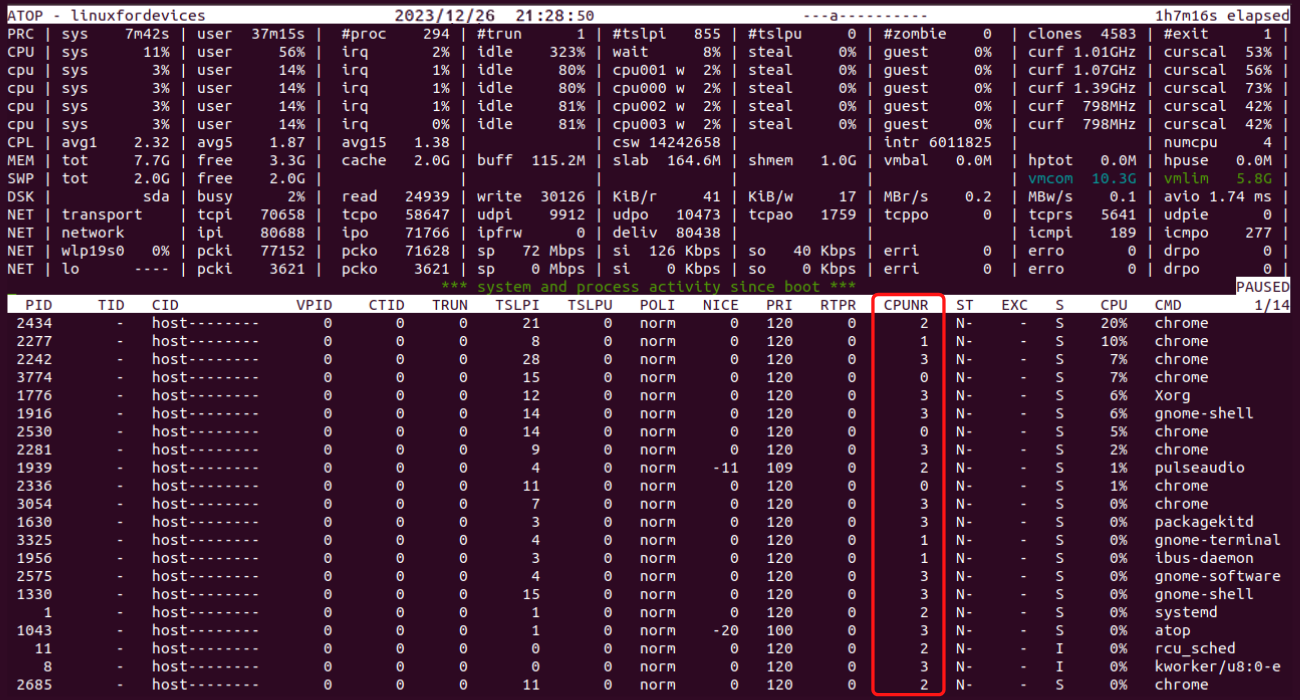
Which core is the process currently operating on?
The scheduling characteristics for a process can be found by using the ‘-s’ option.
atop -s
A couple of impressive stunts at the top
There are a few ‘atop’ command hacks that could come in handy.
- Pausing the ‘atop’ screen – using ‘z’ key.
- Changing the time interval of value updates – using ‘i’ key followed by the number of seconds, we wish to change it to.
- Interrupt to instantly update the values – using ‘t’ key.
- Quitting the display – using ‘q’ key.
In summary,
We are aware that the ‘atop’ command can be overwhelming for Linux users. Mastering this exceptional command requires dedication and determination. If you have any questions, feel free to reach out to us in the comments section.
more tutorials
Partition in Linux Step-by-Step Guide(Opens in a new browser tab)
automatic scaling of Kubernetes pods using Metrics Server?(Opens in a new browser tab)
multithreading in Java that you need to know(Opens in a new browser tab)
Adding a string to a Python variable(Opens in a new browser tab)
Using Telnet Commands in Linux/Unix(Opens in a new browser tab)

