init or Swift initialization in Swift
In this Swift tutorial, we will be focusing on a crucial concept known as Swift init or Swift initialization. The process of initialization occurs when we generate an instance of a certain type.
Initialize a Swift object.
Initialization is the act of getting a class, structure, or enumeration ready to be used by setting an initial value for each stored property and performing any necessary setup or initialization before the instance can be used.
In Java programming, constructors and initializers function in a similar manner. Due to Swift’s type-safe nature, there are numerous rules that govern how initializers are implemented. Unless you have a solid understanding of the concept, it can be challenging to successfully execute them.
The syntax for initializing in Swift.
init() {
    // initialise the stored properties here.
}
Below is an example class for us to examine.
class A{

    //Compilation error. No initializer is defined.
    var a : Int
    var b : String
    var c : Int?
    let website = "SC"
}
The class mentioned will not compile because the Swift compiler raises an error regarding the uninitialized stored properties. It is not possible to keep stored properties in an uncertain state. Therefore, we are left with two potential choices.
-
- You can set a default value for a property directly in its definition.
- To initialize properties, employ an initializer called init().
We will examine each of the approaches individually.
class A{

    var a : Int = 5
    var b : String = "Hello. How you're doing"
    var c : Int?
    let website = "SC"
}
Once the stored properties have been assigned default values, Swift automatically provides a default initializer. After initializing the class instance, all properties and functions can be accessed using the dot operator.
var object = A()
object.a = 10
object.c = 2
One option for paraphrasing the sentence natively could be:
You can also initialize the stored properties by utilizing the init() method demonstrated in the example below.
class A{

    var a : Int
    var b : String
    var c : Int?
    let website = "SC"

    init(a: Int, b: String) {
        self.a = a
        self.b = b
    }
}

var object = A(a: 5, b: "Hello World")
The Swift Optional type does not require initialization since it is not a stored property. Stored properties, on the other hand, can be accessed using the self property within the init() method. It is important to note that self is used to refer to the current instance within its own instance methods, similar to how “this” is used in Java. The initializer mentioned above is the main initializer of the class and is also known as the designated initializer. It is worth mentioning that initializers allow us to modify constant properties as well.
class A{

    var a : Int
    var b : String
    var c : Int?
    let website : String

    init(a: Int, b: String, website: String) {
        self.a = a
        self.b = b
        self.website = website
    }
}

var object = A(a: 5,b: "Hello World", website: "SC")
Memberwise initializers for structures can be paraphrased as initializers that initialize the members of a structure individually.
Value types like structures do not always need a defined initializer. By default, structures automatically receive a memberwise initializer, unless custom initializer(s) have been defined. Below are examples of code snippets that demonstrate different ways to initialize a structure.
struct Rect{
    var length : Int
    var breadth : Int
}
var r = Rect(length: 5, breadth: 10)
struct Rect{
    var length : Int = 5
    var breadth : Int = 10
}

var r = Rect()
var r1 = Rect(length: 10, breadth: 5)
Because we have set default values for the stored properties in the code above, we now have a default initializer without any member initialization in addition to the memberwise initializer.
struct Rect{
    var length : Int
    var breadth : Int

    init(length: Int, breadth: Int) {
        self.length =  length + 10
        self.breadth = breadth + 10
    }
}
var r = Rect(length: 10, breadth: 5)
In the given scenario, we have created our own custom initializer. If we don’t need an external name for the initializer, we can indicate it by using an underscore ‘_’ as shown below.
class A{

    var a : Int
    var b : String
    var c : Int?
    let website = "SC"

    init(_ a: Int, _ b: String) {
        self.a = a
        self.b = b
    }
}

var object = A(5,"Hello World")
struct Rect{
    var length : Int
    var breadth : Int

    init(_ length: Int, _ breadth: Int) {
        self.length =  length + 10
        self.breadth = breadth + 10
    }
}
var r = Rect(10, 10)
Different Types of Initializers in Swift
There are several types of class initializers that can be broadly categorized as follows:
-
- Primary initializers, also known as designated initializers, are responsible for fully initializing all properties introduced by their class before calling any superclass initializer. It is possible for a class to have multiple designated initializers, but at least one is required for every class.
On the other hand, secondary initializers called convenience initializers, provide additional initialization options for a class. They must call a designated initializer of the same class. Convenience initializers are not mandatory and can be used for custom setups. They have the same syntax as primary initializers, but with the convenience modifier placed before the init keyword.
class Student{

    var name : String
    var degree : String

    init(name : String, degree: String) {
        self.name = name
        self.degree = degree
    }

    convenience init()
    {
        self.init(name: "Unnamed", degree: "Computer Science")
    }

}
var student = Student()
student.degree // "Computer Science"
student.name // "Unnamed"
Convenience initializers are beneficial for automatically assigning default values to stored properties.
Initializer delegation for value types in Swift.
You can avoid repeating code by calling one initializer from another. Structures, which are value types, do not have inheritance capabilities. So, the only way to call an initializer within the same structure is through this method. An example is provided below.
struct Rect{
    var length : Int
    var breadth : Int

    init(_ length: Int, _ breadth: Int) {
        self.length =  length
        self.breadth = breadth
    }

    init(_ length: Int)
    {
        self.init(length, length)
    }
}
var r = Rect(10, 5)
var r1 = Rect(15) //initialises the length and breadth to 15
Initializer Delegation in Swift for Reference Types.
Since classes are reference types, they can inherit from other classes and their initializers can also call initializers from the superclass. This allows for the proper inheritance and initialization of all values. The following rules are defined to handle relationships between initializers.
- A designated initializer must call a designated initializer from its immediate superclass.
- A convenience initializer must call another initializer from the same class.
- A convenience initializer must ultimately call a designated initializer.
The above rules are depicted in the following illustration.
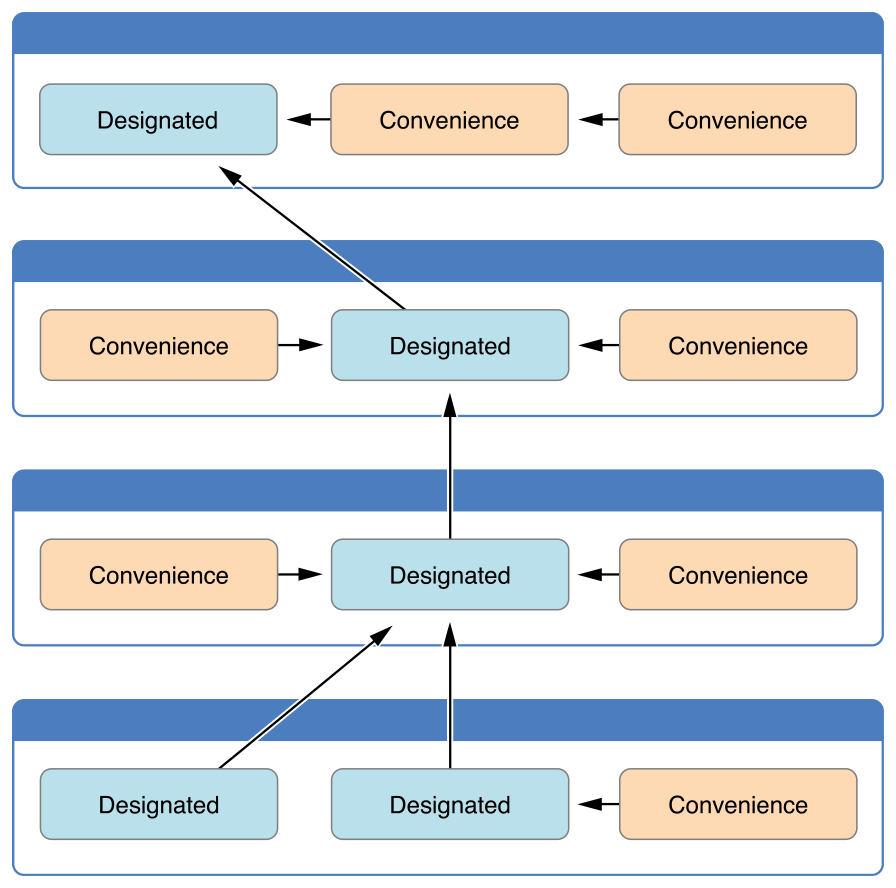
In a subclass, convenience initializers cannot use the super keyword and must delegate across, while designated initializers must always delegate up.
Inheriting and overriding Swift initializers.
By default, subclasses in Swift do not automatically inherit initializers from their superclass unless specific criteria are fulfilled (Automatic Initializer Inheritance). This approach is implemented to avoid incomplete initialization in subclasses. Now, let’s examine the functionality of designated and convenience initializers in the context of inheritance. To begin with, we will establish a base class called Vehicle, which will serve as the foundation for the subclasses. The classes will utilize Enums as a data type. Here is the definition of our Vehicle base class:
enum VehicleType : String {
    case twoWheeler = "TwoWheeler"
    case fourWheeler = "FourWheeler"
}

class Vehicle{

    var vehicleType : VehicleType

    init(vehicleType: VehicleType) {
        self.vehicleType = vehicleType
        print("Class Vehicle. vehicleType is \(self.vehicleType.rawValue)\n")
    }

    convenience init()
    {
        self.init(vehicleType: .fourWheeler)
    }
}

var v = Vehicle(vehicleType: .twoWheeler)
Please note that the convenience initializer needs to call the designated initializer of the same class by using self.init. Now, we will create a subclass of the class mentioned above, following the example below.
enum TwoWheelerType : String
{
    case scooty = "Scooty"
    case bike = "Bike"
}

class TwoWheeler : Vehicle{

    var twoWheelerType : TwoWheelerType
    var manufacturer : String

    init(twoWheelerType : TwoWheelerType, manufacturer : String, vType : VehicleType) {
        self.twoWheelerType = twoWheelerType
        self.manufacturer = manufacturer
        print("Class TwoWheeler. \(self.twoWheelerType.rawValue) manufacturer is \(self.manufacturer)")
        super.init(vehicleType: vType)

    }
}
Key points to take into consideration:
- The designated initializer of the subclass must initialize its own properties before calling the designated initializer of the superclass.
- A subclass can modify inherited properties of the superclass only after the super.init is called.
The code provided would result in a compile-time error.
class TwoWheeler : Vehicle{

    var twoWheelerType : TwoWheelerType
    var manufacturer : String

    init(twoWheelerType : TwoWheelerType, manufacturer : String, vType : VehicleType) {
        self.twoWheelerType = twoWheelerType
        self.manufacturer = manufacturer
        self.vehicleType = vType //Won't compile
        super.init(vehicleType: vType)
        //self.vehicleType = .fourWheeler //This would work.

    }
}

var t = TwoWheeler(twoWheelerType: .scooty, manufacturer: "Hero Honda", vType: .twoWheeler)
As mentioned before, the subclass does not automatically inherit the superclass initializer. Therefore, the initialization below would not be successful.
var t = TwoWheeler(vehicleType: .twoWheeler) //manufacturer property isn't initialized.
In order to override an initializer, the subclass initializer needs to be identical to the superclass’s designated initializer. In such a situation, the override keyword is added to the initializer.
class TwoWheeler : Vehicle{

    var twoWheelerType : TwoWheelerType
    var manufacturer : String

    init(twoWheelerType : TwoWheelerType, manufacturer : String, vType : VehicleType) {
        self.twoWheelerType = twoWheelerType
        self.manufacturer = manufacturer
        print("Class TwoWheeler. \(self.twoWheelerType.rawValue) manufacturer is \(self.manufacturer)")
        super.init(vehicleType: vType)

    }

    override init(vehicleType: VehicleType)
    {
        print("Class TwoWheeler. Overriden Initializer. \(vehicleType.rawValue)")
        self.twoWheelerType = .bike
        self.manufacturer = "Not defined"
        super.init(vehicleType: vehicleType)
    }
The initializer below does not override the one from the superclass because it has a different parameter name.
//This would give a compile-time error since the parameter v doesn't match with the superclass.
override init(v: VehicleType)
    {
        self.twoWheelerType = .bike
        self.manufacturer = "Not defined"
        super.init(vehicleType: v)
    }
Using a convenience initializer to override the superclass’s initializer.
class TwoWheeler : Vehicle{

    var twoWheelerType : TwoWheelerType
    var manufacturer : String

    init(twoWheelerType : TwoWheelerType, manufacturer : String, vType : VehicleType) {
        self.twoWheelerType = twoWheelerType
        self.manufacturer = manufacturer
        print("Class TwoWheeler. \(self.twoWheelerType.rawValue) manufacturer is \(self.manufacturer)")
        super.init(vehicleType: vType)

    }

    override convenience init(vehicleType: VehicleType) {
        self.init(twoWheelerType: .bike, manufacturer: "Not Defined", vType: .twoWheeler)
        self.vehicleType = vehicleType
    }
}
var t = TwoWheeler(twoWheelerType: .scooty, manufacturer: "Hero Honda", vType: .twoWheeler)
t = TwoWheeler(vehicleType: .twoWheeler)

//Output
Following gets printed on the console:
Class TwoWheeler. Scooty manufacturer is Hero Honda
Class Vehicle. vehicleType is TwoWheeler

Class TwoWheeler. Bike manufacturer is Not Defined
Class Vehicle. vehicleType is TwoWheeler
The override keyword is added to the convenience initializer, which then calls the designated initializer within the same class. It should be noted that the order of the keywords convenience and override is not important.
Necessary initializers.
To ensure that each subclass implements a specific initializer, it is necessary to add the keyword “required” before the initializer. Furthermore, this “required” modifier must also be included in the corresponding subclass implementations. Here is an example demonstrating the use of Required Initializers on the mentioned classes.
class Vehicle{

    var vehicleType : VehicleType

    required init(vehicleType: VehicleType) {
        self.vehicleType = vehicleType
        print("Class Vehicle. vehicleType is \(self.vehicleType.rawValue)\n")
    }

    convenience init()
    {
        self.init(vehicleType: .fourWheeler)
    }
}

class TwoWheeler : Vehicle{

    var twoWheelerType : TwoWheelerType
    var manufacturer : String

    init(twoWheelerType : TwoWheelerType, manufacturer : String, vType : VehicleType) {
        self.twoWheelerType = twoWheelerType
        self.manufacturer = manufacturer
        print("Class TwoWheeler. \(self.twoWheelerType.rawValue) manufacturer is \(self.manufacturer)")
        super.init(vehicleType: vType)

    }

     required init(vehicleType: VehicleType) {
        self.manufacturer = "Not Defined"
        self.twoWheelerType = .bike
        super.init(vehicleType: vehicleType)
    }
}
Please note that by adding a required modifier, the initializer will be overridden, allowing the override keyword to be omitted. The usage of a required initializer, along with convenience required and convenience initializers, is separate and can be combined. To illustrate this, we will create another subclass of Vehicle.
enum FourWheelerType : String
{
    case car = "Car"
    case bus = "Bus"
    case truck = "Truck"
}


class FourWheeler : Vehicle
{
    var fourWheelerType : FourWheelerType
    var name : String

    init(fourWheelerType : FourWheelerType, name: String, vehicleType: VehicleType) {
        self.fourWheelerType = fourWheelerType
        self.name = name
        print("Class FourWheeler. \(self.fourWheelerType.rawValue) Model is \(self.name)")
        super.init(vehicleType: vehicleType)
        self.vehicleType = vehicleType
    }

    required convenience init(vehicleType: VehicleType) {
        self.init(fourWheelerType: .bus, name: "Mercedes", vehicleType: vehicleType)
    }
}


class Car : FourWheeler{

    var model : String

    init(model: String) {
        self.model = model
        print("Class Car. Model is \(self.model)")
        super.init(fourWheelerType: .car, name: self.model, vehicleType: .fourWheeler)
    }

    required init(vehicleType: VehicleType)
    {
        self.model = "Not defined"
        print("Class Car. Model is \(self.model)")
        super.init(fourWheelerType: .car, name: self.model, vehicleType: vehicleType)
    }

}
Key points to consider in the given code excerpt:
- Convenience initializers are secondary initializers in a class.
- Setting a convenience initializer as required means that implementing it in the subclass is compulsory.
Inheritance of Automatic Initializers
A subclass automatically inherits the initializers from the superclass in two different scenarios.
- Don’t define any designated initializers in your subclass.
- Implement all the designated initializers of the superclass. All the convenience initializers would be automatically inherited too.
The snippet below exemplifies the first rule in action.
class Name {

    var name: String

    init(n: String) {
        self.name = n
    }
}

class Tutorial: Name {

    var tutorial : String? = "Swift Initialization"
}

var parentObject = Name(n: "Anupam")
var childObject = Tutorial(n: "SC")
The snippet below demonstrates the second rule in action.
class Name {

    var name: String

    init(n: String) {
        self.name = n
    }

    convenience init()
    {
        self.init(n: "No name assigned")
    }
}

class Tutorial: Name {

    var tutorial : String? = "Swift Tutorial"

    override init(n : String) {
        super.init(n: n)
    }
}

var parentObject = Name(n: "Anupam")
var childObject = Tutorial(n: "SC")
var childObject2 = Tutorial()
print(childObject2.name) //prints "No name assigned
In the above code, the subclass can automatically access the convenience initializer of the superclass.
Failable Initializer in Swift
Failable initializers can be defined using the keyword init? on Classes, Structures, or Enumerations. These initializers are called when the initialization process fails due to reasons such as invalid parameter values or absence of an external source. By creating an optional value of the initialized type, a failable initializer can trigger an initialization failure by returning nil, even though an init method doesn’t technically return anything. Failable Initializers are applicable to Structures as well.
struct SName {
    let name: String
    init?(name: String) {
        if name.isEmpty { return nil }
        self.name = name
    }
}

var name = SName(name: "SC")
if name != nil {
    print("init success") //this gets displayed
}
else{
    print("init failed")
}
name  = SName(name: "")

if name != nil {
    print("init success")
}
else{
    print("init failed") //this gets displayed
}
Enums that can have initializers that can potentially fail.
enum CharacterExists {
    case A, B
    init?(symbol: Character) {
        switch symbol {
        case "A":
            self = .A
        case "B":
            self = .B
        default:
            return nil
        }
    }
}


let ch = CharacterExists(symbol: "C")
if ch != nil {
    print("Init failed. Character doesn't exist")
}
class CName {
    let name: String
    init?(name: String) {
        if name.isEmpty { return nil }
        self.name = name
    }
}
var name  = CName(name: "")

if name != nil {
    print("init success")
}
else{
    print("init failed")
}
Please note that it is not possible for a failable initializer and a non-failable initializer to share the same parameter types and names.
Replacing a Failable Initializer
In your subclass, it is possible to replace a failable initializer with a non-failable initializer, but the reverse is not allowed. Below is an example demonstrating the override of a failable initializer with a non-failable initializer.
class CName {
    let name: String
    init?(name: String) {
        if name.isEmpty { return nil }
        self.name = name
    }
}
var name  = CName(name: "")

class SubName : CName{

    var age : Int
    override init(name: String)
    {
        self.age = 23
        super.init(name: name)!
    }
}
Forced unwrapping is employed to invoke a failable initializer from the superclass while implementing a nonfailable initializer in a subclass. This concludes the Swift initialization tutorial, with references from Apple Docs.
More Tutorials
Progress Bar iOS also known as Progress View(Opens in a new browser tab)
Set in Python(Opens in a new browser tab)
Java String substring() method(Opens in a new browser tab)
Python Substring refers to extracting a smaller portion of a string.(Opens in a new browser tab)

