one-click installation feature of Ruby on Rails on Silicon Cloud.
In this section, we will provide an introductory explanation.
Rails, also known as Ruby on Rails, offers a web application framework that enables the creation of websites and web applications using the Ruby programming language. By utilizing both Ruby and Rails, you can swiftly develop and launch scalable applications.
This guide will walk you through the process of setting up a Silicon Cloud vServer with pre-installed Ruby on Rails using the Silicon Cloud Ruby on Rails 1-Click App. Once you’ve created your vServer, you’ll be introduced to some common commands and use cases. Since this 1-Click vServer is built on a standard Ubuntu 20.04 vServer, you can explore more Ruby tutorials once you’ve completed this guide.
Instant deployment with a single click
The Ubuntu 20.04 vServer is equipped with the Ruby on Rails 1-Click, which includes the following packages already installed.
| Package | Version |
|---|---|
| Ruby | 27.2 |
| Rails | 6.0.3.4 |
| Puma | 5.0.2 |
| Postgres | 12.4 |
| Nginx | 1.17.10 |
| Node.js | 12.19.0 |
| Certbot | 0.40.0 |
Besides installing the package, this 1-Click option also manages:
- Enabling UFW firewall that allows access only for SSH (port 22), HTTP (port 80), and HTTPS (port 442).
- Creates a rails system user to deploy the application, as well as a rails database user to connect with PostgreSQL.
- Configures Ruby to use the installed software and install all Gems and processes locally to your rails user.
- Configures Nginx to forward requests to the local UNIX socket, serving as a reverse proxy for the application server.
At the time of writing, an Ubuntu 20.04 server is currently hosting these packages together with Ruby on Rails version 7.0.4.2.
Requirements
In order to start using Ruby on Rails 1-Click on your browser, you’ll require a domain name. You can refer to the Silicon Cloud DNS quickstart guide to understand the process of setting up a domain using their DNS service.
First, we will start by setting up a Ruby on Rails vServer.
To start setting up your Ruby on Rails 1-Click vServer, find it in our selection of Marketplace Applications and click on the Ruby on Rails option. This will redirect you to the Silicon Cloud Control Panel.
To commence the creation of your vServer, simply click on the button labeled “Create Ruby on Rails vServer.”

If you are not currently logged in to your Silicon Cloud account, you must log in to continue. If you do not have an account, you will be asked to register.
Afterwards, you’ll be directed to the page where you can create your vServers. At this stage, you have the option to personalize your server settings before generating your Ruby on Rails vServer. Our comprehensive guide on Creating your Initial vServer provides a detailed explanation of all the decisions you need to make. However, the subsequent sections highlight crucial settings that should be taken into account.
Picking out a picture
Once your image is set, it will be displayed in the Marketplace tab with the selection of Ruby on Rails. In case it is not set, you should navigate to the Marketplace tab and use the keyword search box to find Ruby on Rails. Once correctly set, your Control Panel will resemble the example provided below.
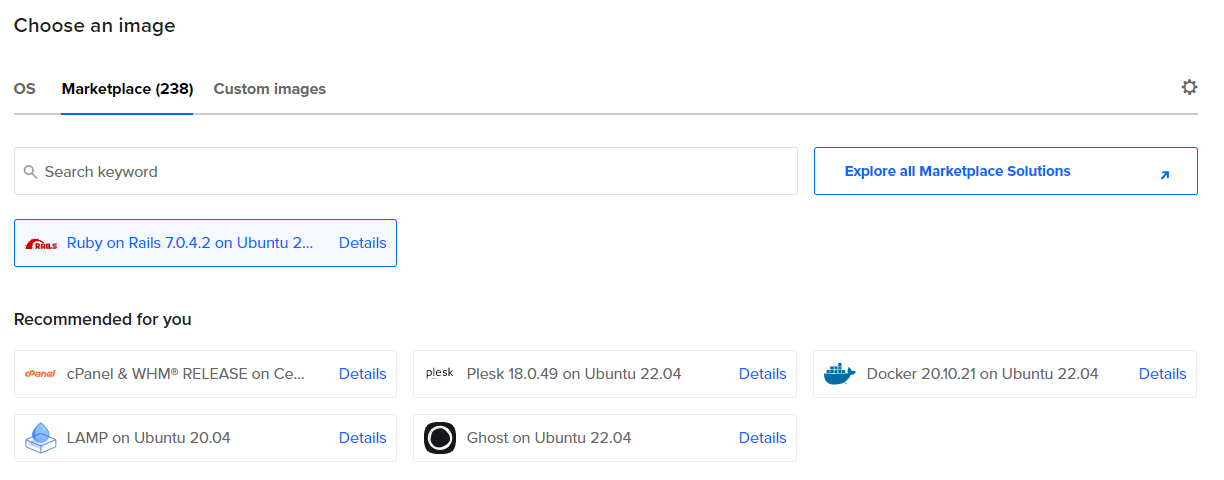
If Ruby on Rails 7.0.4.2 on Ubuntu 20.04 is not chosen, search for it using the search box.
After selecting the appropriate Ruby on Rails image, you have the option to either accept the default settings or modify them based on your specific requirements. We usually suggest the following modifications:
Deciding on a region for a datacenter.
For optimal performance, it is advisable to choose a datacenter region that is nearest to your users. In certain regions, we have multiple datacenters available. However, there is no distinction between these datacenters within the same region, such as SFO3 and SFO2.
Deciding on a course of action.
Choose a suitable plan that suits your requirements, keeping in mind the flexibility to adjust your vServer’s size as per your needs. For optimal performance when running a vServer with Ruby on Rails, it is advisable to have a minimum of 1GB RAM.
Deciding on the method of authentication
For your vServer’s authentication method, it is advisable to opt for the SSH Key option instead of using a Password. Typically, authentication through SSH Keys offers higher security.
Choosing more choices
Enabling enhanced metrics monitoring and alerting on your vServer allows you to conveniently track resource usage over time. Additionally, it is worth considering the activation of automated backups. In case you prefer, you can always enable backup functionality on vServers you have previously set up at a later stage.
Deciding on a title for a network device
Choose a name for your vServer that you can easily remember. For example, you could name it “vServer for Ruby on Rails 1” or name it after the specific application you plan to use it for.
Once you have completed selecting all your options, click on the Create vServer button located at the bottom of the Control Panel screen. Once the vServer has been created, its IP address will be shown.

You will require this IP address to link to your vServer and for any upcoming configurations. Hovering over the IP address allows you to easily copy it to your clipboard.
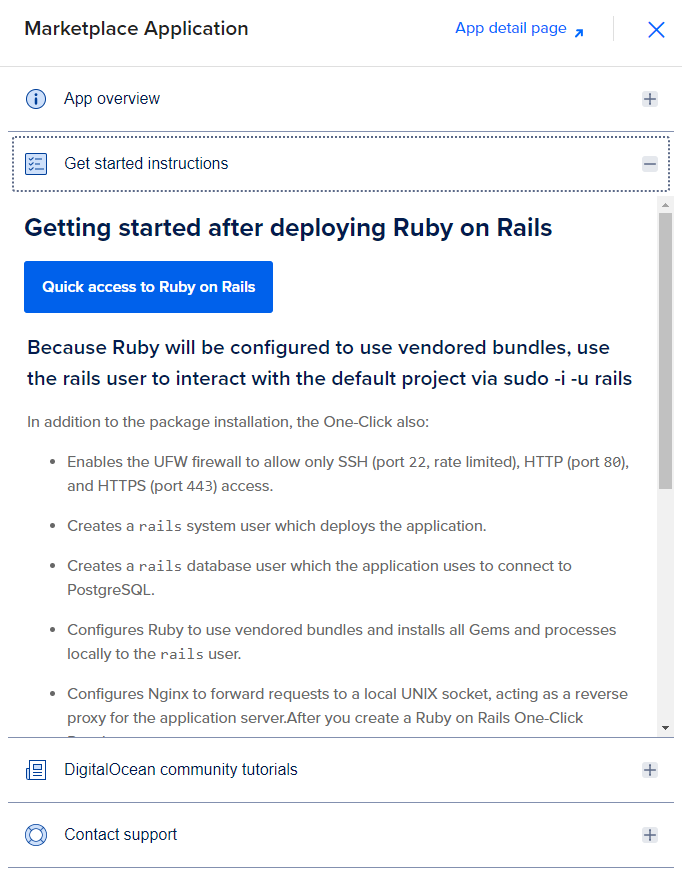
vServers generated via the 1-Click Marketplace feature also provide supplementary resources that can be accessed by clicking the Get started link.

By clicking on this, a new panel will appear providing extra information that pertains to your selected 1-Click. This information encompasses a summary, additional steps to initiate the use of your vServer, and hyperlinks to pertinent tutorials available on our Community site. In addition, there are helpful links directing you to where you can access support and discover further resources for Ruby on Rails. By consulting the official Ruby on Rails documentation, you can also receive assistance.
Afterwards, you will be able to connect to your Ruby on Rails vServer through the terminal using the SSH authentication method you previously established.
Step 2 — Using SSH to access the vServer and enable configuration.
After creating your Ruby on Rails vServer, you will have to establish an SSH connection with it. This involves connecting to the server through the command line. If you are unfamiliar with terminal programs like SSH or PuTTY, you can refer to the guide “How To Connect To Your vServer with SSH.” Once you are prepared, open a terminal on your computer and use the command provided below to log into your vServer as root via SSH. Remember to replace the IP address with the IP address of your own vServer.
- ssh root@your_server_ip
Once you’ve signed in, you’ll see the Message of the Day (MOTD), which will provide details about the software installed on this application and the various features set up specifically for you as mentioned under the 1-Click Deployment category.
Thank you for using Silicon Cloud's Rails Application.

The "ufw" firewall is enabled. All ports except for 22, 80, and 443 are BLOCKED.

Let's Encrypt has been pre-installed for you. If you have a domain name, and
you will be using it with this 1-Click app, please see: https://do.co/2GOFe5J

You can use the following SFTP credentials to upload your files (using FileZilla/WinSCP/Rsync):
  * Host: 24.199.120.116
  * User: rails
  * Pass: cd083867dfdb40970449c422797378c1
If you provided an ssh-key when creating this vServer, the key should be used for SFTP as well

You can use the following Postgres database credentials:
  * User: rails
  * Pass: a0d8c213e0d797342b1450e4e880180f

Ruby has been configured to use vendored bundles. Please use the 'rails' user to
interact with the default project via "su - rails"

Passwords have been saved in /root/.digitalocean.passwords

Nginx is configured to forward requests for rails to a local unix socket
    Public IP: http://24.199.120.116
    Access Logs: /var/log/nginx/access.log
    Error Logs: /var/log/nginx/error.log

Rails using the Puma server is managed via 'systemd'.
    Proccess management: systemctl {start|stop|restart} rails.service
    systemd Unit file: /etc/systemd/system/rails.service

Ruby information:
    All Gems and processes have been installed locally to the 'rails' user. Please
    'su - rails' to use this environment.

You can learn more about using this image here: https://do.co/2GTOVjB

-------------------------------------------------------------------------------------
To delete this message of the day: rm -rf /etc/update-motd.d/99-one-click
Here are a few additional points to take note of in this message:
- The credentials for your systems and databases user passwords will be available. This information is also saved within the following directory /root/.digitalocean.passwords.
- Your SFTP credentials if you want to upload files using software such as FileZilla, WinSCP, or rsync
- Information about how Rails uses Puma, managed by systemd to start, stop, restart, or check the status of Puma.
Step 3 — Verifying Ruby on Rails in Your Web Browser
To verify if Ruby on Rails is functioning properly, you can access your IP address or domain details.
http://your_IP_or_domain
You don’t need to perform any extra binding steps, like running rails server –binding=your_IP_or_domain, as it’s already taken care of during the 1-Click installation process.
If you are successful, you will be presented with the following webpage on your browser.
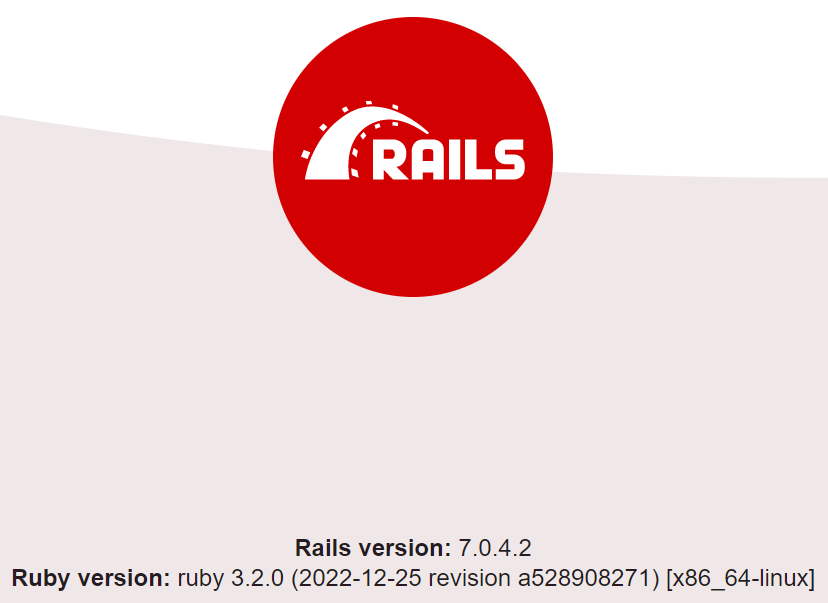
If you encounter an error, it is advisable to ensure that you have correctly set up the domain as per the prerequisites. Additionally, you should verify if the service is currently active.
Step 4 – Verifying that your Ruby on Rails service is operational.
There are multiple ways to control your Ruby on Rails service using Puma. One way is to use the following command to see the status of the service:
- systemctl status rails.service
● rails.service - ExampleApp
     Loaded: loaded (/etc/systemd/system/rails.service; enabled; vendor preset:>
     Active: active (running) since Tue 2023-01-31 18:29:55 UTC; 37min ago
   Main PID: 2172 (ruby)
      Tasks: 13 (limit: 1116)
     Memory: 143.6M
        CPU: 3.518s
     CGroup: /system.slice/rails.service
             └─2172 "puma 5.6.5 (tcp://0.0.0.0:3000) [example]" "" "" "" "" ""
This result indicates that the service is presently active (in operation). Once you have confirmed that Ruby on Rails is running smoothly, you can proceed to create a simple program using Ruby. Additionally, you can also look into different process management commands like the ones mentioned below.
To initiate the service, execute the following command:
- systemctl start rails.service
To halt the operation, execute:
- systemctl stop rails.service
In order to initiate the service again, execute the following command:
- systemctl restart rails.service
In conclusion
Your Ruby on Rails 1-Click vServer is prepared for use. However, depending on your project requirements, you may need to utilize different features. Here is a compilation of tutorials that will help you uncover the full potential of the pre-installed software on your Ruby on Rails vServer.
- To start building a Ruby on Rails application, you can learn how to get started with our tutorial on How To Build a Ruby on Rails Application.
- To learn more about the Rails ecosystem, you can read through theproject documentation.
- To set up a robust frontend project with a framework such as React, you can check out our tutorial on How To Set Up a Ruby on Rails Project with a React Frontend.
- To learn about other database options, such as SQLite, read our tutorial on How To Use PostgreSQL with Your Ruby on Rails Application
- To add nested resources to your project, check out our tutorial on How To Create Nested Resources for a Ruby on Rails Application.
- To learn how to write other Ruby programs, you can read our tutorial on How To Write Your First Ruby Program.
Check out our tutorial series to gain a deeper understanding of Ruby and Ruby on Rails.
other tutorials
Installation of Arch Linux(Opens in a new browser tab)
multithreading in Java that you need to know(Opens in a new browser tab)
Interview Questions for Web Services – SOAP, RESTful(Opens in a new browser tab)
Partition in Linux Step-by-Step Guide(Opens in a new browser tab)

