AndroidのJSONObject – AndroidでのJSONパース
AndroidアプリでJSONパースにはAndroidのJSONObjectが使用されます。このチュートリアルでは、JSONデータをパースするためにAndroidアプリケーションにJSONObjectを実装し、その使用方法について説明します。JSONはJavaScriptオブジェクト表記法の略です。
JSONとは何ですか?
JSONは、サーバーとのデータのやり取り(投稿と取得)に使用されます。したがって、その構文と使いやすさを知ることが重要です。JSONはXMLの最良の代替手段であり、人間により読みやすくなっています。JSONは言語に依存しないため、任意の言語(Java/C/C++)でJSONをプログラムすることができます。サーバーからのJSONの応答は、多くのフィールドで構成されています。以下に、例となるJSONの応答/データを示します。これを参考にして、アプリケーションに実装します。
{
  "title":"JSONParserTutorial",
  "array":[
    {
    "company":"Google"
    },
    {
      "company":"Facebook"
    },
    {
    "company":"LinkedIn"
    },
    {
      "company" : "Microsoft"
    },
    {
      "company": "Apple"
    }
    ],
    "nested":{
    "flag": true,
    "random_number":1
    }
}
このページからランダムなJSONデータ文字列を生成しました。JSONデータの編集に便利です。以下に4つの主要なコンポーネントがリストアップされているJSONデータです。
-
- 配列:JSON配列は角括弧([)で囲まれています。オブジェクトのセットを含んでいます。
-
- オブジェクト:中括弧({)で囲まれたデータは、単一のJSONObjectです。ネストされたJSONオブジェクトは可能で、非常によく使用されています。
-
- キー:すべてのJSONObjectは、特定の値を含むキー文字列を持っています。
- 値:各キーは、文字列、浮動小数点数、整数、ブール値など、任意のタイプの単一の値を持っています。
アンドロイドのJSONObject
上記の静的なJSONデータ文字列からJSONObjectを作成し、そのJSONArrayをListViewに表示します。JSONデータのタイトル文字列をアプリケーション名に変更します。
AndroidのJSON解析の例を示します。

アンドロイドJSONパースコード
以下にactivity_main.xmlが示されています。
<?xml version="1.0" encoding="utf-8"?>
<RelativeLayout xmlns:android="https://schemas.android.com/apk/res/android"
    xmlns:tools="https://schemas.android.com/tools"
    android:layout_width="match_parent"
    android:layout_height="match_parent"
    android:paddingBottom="@dimen/activity_vertical_margin"
    android:paddingLeft="@dimen/activity_horizontal_margin"
    android:paddingRight="@dimen/activity_horizontal_margin"
    android:paddingTop="@dimen/activity_vertical_margin"
    tools:context="com.scdev.jsonparsing.MainActivity">

    <ListView
        android:layout_width="wrap_content"
        android:id="@+id/list_view"
        android:layout_height="match_parent"/>

</RelativeLayout>
下記にMainActivity.javaが掲載されています。
package com.scdev.jsonparsing;

import android.support.v7.app.AppCompatActivity;
import android.os.Bundle;
import android.util.Log;
import android.widget.ArrayAdapter;

import android.widget.ListView;

import org.json.JSONArray;
import org.json.JSONException;
import org.json.JSONObject;

import java.util.ArrayList;
import java.util.List;

public class MainActivity extends AppCompatActivity {


    String json_string = "{\n" +
            "  \"title\":\"JSONParserTutorial\",\n" +
            "  \"array\":[\n" +
            "    {\n" +
            "    \"company\":\"Google\"\n" +
            "    },\n" +
            "    {\n" +
            "      \"company\":\"Facebook\"\n" +
            "    },\n" +
            "    {\n" +
            "    \"company\":\"LinkedIn\"\n" +
            "    },\n" +
            "    {\n" +
            "      \"company\" : \"Microsoft\"\n" +
            "    },\n" +
            "    {\n" +
            "      \"company\": \"Apple\"\n" +
            "    }\n" +
            "    ],\n" +
            "    \"nested\":{\n" +
            "    \"flag\": true,\n" +
            "    \"random_number\":1\n" +
            "    }\n" +
            "}";


    @Override
    protected void onCreate(Bundle savedInstanceState) {
        super.onCreate(savedInstanceState);
        setContentView(R.layout.activity_main);
        try {

            ListView listView = (ListView) findViewById(R.id.list_view);

            List<String> items = new ArrayList<>();
            JSONObject root = new JSONObject(json_string);

            JSONArray array= root.getJSONArray("array");

            this.setTitle(root.getString("title"));

            for(int i=0;i<array.length();i++)
            {
                JSONObject object= array.getJSONObject(i);
                items.add(object.getString("company"));
            }

            ArrayAdapter<String> adapter = new ArrayAdapter<String>(this,
                    android.R.layout.simple_list_item_1, items);

            if (listView != null) {
                listView.setAdapter(adapter);
            }

            JSONObject nested= root.getJSONObject("nested");
            Log.d("TAG","flag value "+nested.getBoolean("flag"));

        } catch (JSONException e) {
            e.printStackTrace();
        }


    }
}
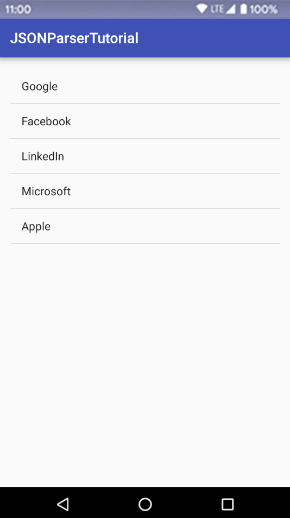
JSONArrayオブジェクトを繰り返し処理し、各子JSONObjectに存在する文字列を取得し、それらをArrayListに追加して、ListViewに表示しました。アプリケーション名は、次のように変更されます:
this.setTitle();
AndroidのJSONObjectの例の出力

AndroidのJSONパーシングJSONObjectプロジェクトをダウンロードします。
参照:公式ドキュメント

