Springコントローラー – Spring MVCコントローラー
Spring Controllerアノテーションは、@Componentアノテーションの特殊化です。Spring Controllerアノテーションは、通常、RequestMappingアノテーションに基づいたアノテーション付きのハンドラーメソッドと組み合わせて使用されます。
春のコントローラー
Spring Controllerのアノテーションは、クラスにのみ適用できます。これはクラスをウェブリクエストハンドラとしてマークするために使用されます。これは主にSpring MVCアプリケーションで使用されます。
春のRestController
Springの@RestControllerは、それ自体が@Controllerと@ResponseBodyで注釈が付けられた便利なアノテーションです。このアノテーションは、RESTfulウェブサービスのリクエストハンドラとしてのクラスを示すために使用されます。
春のコントローラーの例
<dependency>
	<groupId>org.springframework</groupId>
	<artifactId>spring-webmvc</artifactId>
	<version>5.0.7.RELEASE</version>
</dependency>
<dependency>
	<groupId>org.springframework</groupId>
	<artifactId>spring-web</artifactId>
	<version>5.0.7.RELEASE</version>
</dependency>

<!-- Jackson for REST -->
<dependency>
	<groupId>com.fasterxml.jackson.core</groupId>
	<artifactId>jackson-databind</artifactId>
	<version>2.9.6</version>
</dependency>
デプロイメントディスクリプタ(web.xml)を見てみましょう。そこで、フロントコントローラとしてDispatcherServletサーブレットを設定します。
<?xml version="1.0" encoding="UTF-8"?>
<web-app xmlns:xsi="https://www.w3.org/2001/XMLSchema-instance" xmlns="https://xmlns.jcp.org/xml/ns/javaee"
 xsi:schemaLocation="https://xmlns.jcp.org/xml/ns/javaee https://xmlns.jcp.org/xml/ns/javaee/web-app_3_1.xsd" id="WebApp_ID" version="3.1">
  <display-name>Spring-Controller</display-name>
  <!-- Add Spring MVC DispatcherServlet as front controller -->
	<servlet>
        <servlet-name>spring</servlet-name>
        <servlet-class>
                org.springframework.web.servlet.DispatcherServlet
        </servlet-class>
        <init-param>
       		<param-name>contextConfigLocation</param-name>
       		<param-value>/WEB-INF/spring-servlet.xml</param-value>
    		</init-param>
        <load-on-startup>1</load-on-startup>
    </servlet>

    <servlet-mapping>
        <servlet-name>spring</servlet-name>
        <url-pattern>/</url-pattern>
    </servlet-mapping>
</web-app>
最後に、私たちは次のスプリングのコンテキストファイルを持っています。ここでは、私たちはアノテーションベースのアプリケーションを設定し、スプリングコンポーネントをスキャンするためのルートパッケージを提供しています。また、InternalResourceViewResolverビーンを設定し、ビューページの詳細も提供しています。
<?xml version="1.0" encoding="UTF-8"?>
<beans:beans xmlns="https://www.springframework.org/schema/mvc"
	xmlns:xsi="https://www.w3.org/2001/XMLSchema-instance" xmlns:beans="https://www.springframework.org/schema/beans"
	xmlns:context="https://www.springframework.org/schema/context"
	xsi:schemaLocation="https://www.springframework.org/schema/mvc https://www.springframework.org/schema/mvc/spring-mvc.xsd
		https://www.springframework.org/schema/beans https://www.springframework.org/schema/beans/spring-beans.xsd
		https://www.springframework.org/schema/context https://www.springframework.org/schema/context/spring-context.xsd">

	<!-- Enables the Spring MVC @Controller programming model -->
	<annotation-driven />

	<context:component-scan base-package="com.scdev.spring" />

	<!-- Resolves views selected for rendering by @Controllers to JSP resources
		in the /WEB-INF/views directory -->
	<beans:bean
		class="org.springframework.web.servlet.view.InternalResourceViewResolver">
		<beans:property name="prefix" value="/WEB-INF/views/" />
		<beans:property name="suffix" value=".jsp" />
	</beans:bean>

</beans:beans>
私たちの設定XMLファイルは準備完了ですので、次はコントローラークラスに進みましょう。
package com.scdev.spring.controller;

import java.text.DateFormat;
import java.util.Date;
import java.util.Locale;

import org.springframework.stereotype.Controller;
import org.springframework.ui.Model;
import org.springframework.web.bind.annotation.GetMapping;

@Controller
public class HomeController {

	@GetMapping("/hello")
	public String home(Locale locale, Model model) {
		Date date = new Date();
		DateFormat dateFormat = DateFormat.getDateTimeInstance(DateFormat.LONG, DateFormat.LONG, locale);
		String formattedDate = dateFormat.format(date);
		model.addAttribute("serverTime", formattedDate);
		return "home";
	}

}
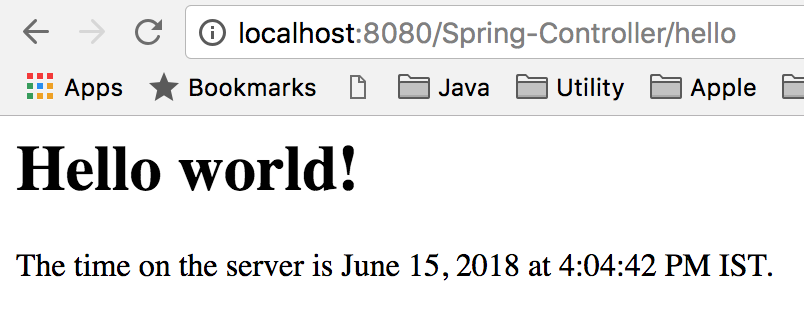
私たちは、単一のリクエストハンドラーメソッドを定義しました。このメソッドは、GETリクエストを受け取り、URIが「/hello」である場合に「home.jsp」ページをレスポンスとして返します。なお、モデルに属性を設定しており、これはhome.jspページで使用されます。次に、私たちのシンプルなhome.jspページのコードです。
<%@ page language="java" contentType="text/html; charset=UTF-8"
	pageEncoding="UTF-8"%>
<html>
<head>
<title>Home</title>
</head>
<body>
	<h1>Hello world!</h1>

	<p>The time on the server is ${serverTime}.</p>

</body>
</html>
Spring MVC コントローラーテスト
SpringのRestControllerの例
さあ、アプリケーションを拡張してREST APIも公開しましょう。JSONレスポンスとして送信されるモデルクラスを作成してください。
package com.scdev.spring.model;

public class Person {

	private String name;

	public String getName() {
		return name;
	}

	public void setName(String name) {
		this.name = name;
	}

}
こちらはシンプルなRESTコントローラークラスです。
package com.scdev.spring.controller;

import org.springframework.web.bind.annotation.RequestMapping;
import org.springframework.web.bind.annotation.RequestParam;
import org.springframework.web.bind.annotation.RestController;

import com.scdev.spring.model.Person;

@RestController
public class PersonRESTController {

	@RequestMapping("/rest")
	public String healthCheck() {
		return "OK";
	}

	@RequestMapping("/rest/person/get")
	public Person getPerson(@RequestParam(name = "name", required = false, defaultValue = "Unknown") String name) {
		Person person = new Person();
		person.setName(name);
		return person;
	}

}
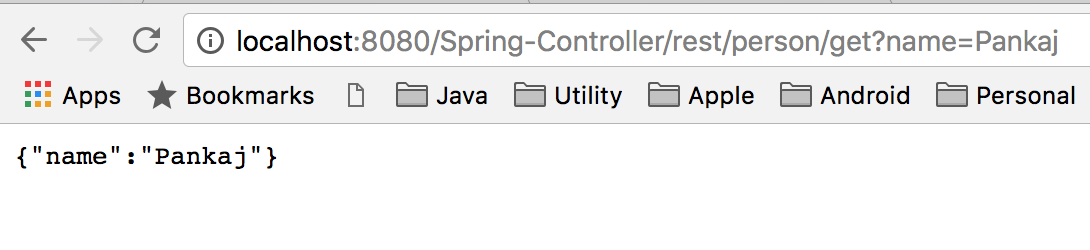
私たちのREST APIをテストするために、アプリケーションを再展開してください。
「SpringのRESTコントローラーテスト」
要約
Spring ControllerはSpring MVCアプリケーションの背骨です。ここにビジネスロジックが始まります。さらに、RestControllerは簡単にレストベースのWebサービスを作成するのに役立ちます。
弊社のGitHubリポジトリから、サンプルプロジェクトのコードをダウンロードすることができます。

