Ubuntu 20.04下Grafana与Prometheus监控MongoDB:完整指南
引言
对于数据库管理员而言,避免性能或内存问题至关重要。像Prometheus和Grafana这样的工具可以帮助您监控数据库集群的性能。Prometheus是一个开源的监控和警报平台,它收集并存储时间序列数据。Grafana则是一个开源的Web应用程序,用于交互式可视化和分析。它允许您从大量数据源中导入数据,查询这些数据,并在可自定义的图表上显示,以便进行简单的分析。您还可以设置警报,以便快速、方便地接收到异常行为的通知。将它们结合使用,您可以收集、监控、分析和可视化来自MongoDB实例的数据。
在本教程中,您将设置一个MongoDB数据库,并使用Prometheus作为数据源来监控它,并通过Grafana进行可视化。为了实现这一目标,您将配置MongoDB导出器作为Prometheus的目标,这样Prometheus就可以收集您的数据库指标,并将其提供给Grafana使用。
先决条件
要跟随本教程,您将需要:
- 一台安装了Ubuntu 20.04服务器,拥有非root用户并具备sudo权限,且已配置UFW防火墙。您可以参考《Ubuntu 20.04初始服务器设置指南》来完成此步骤。
- 在Ubuntu 20.04服务器上安装MongoDB。您可以参考教程《如何在Ubuntu 20.04上安装MongoDB》来完成此步骤。
- 在Ubuntu 20.04服务器上安装Grafana。您可以参考教程《如何在Ubuntu 20.04上安装和保护Grafana》的第1至第4步来完成此步骤。
安装Grafana可能需要以下内容:
- 一个完全注册的域名。本教程中将使用“您的域名”作为示例。您可以在Namecheap购买域名,在Freenom免费获取,或者使用您选择的任何域名注册商。
- 为您的服务器设置以下DNS记录。如果您使用Silicon Cloud,可以参考《如何添加域名》文章了解详细信息:
- 一个A记录,将“您的域名”指向您服务器的公共IP地址。
- 一个A记录,将“www.您的域名”指向您服务器的公共IP地址。
- 按照《如何在Ubuntu 20.04上安装Nginx》教程设置Nginx,包括为您的域名配置服务器块。
- 一个配置了Let’s Encrypt的Nginx服务器块,您可以参考《如何在Ubuntu 20.04上使用Let’s Encrypt保护Nginx》来设置。
第一步 – 安装和配置Prometheus
Prometheus是一个开源的系统监控和报警工具包,它以时间序列数据的形式收集和存储度量指标。也就是说,度量信息将与记录它的时间戳一同存储。在这个步骤中,您将安装Prometheus并配置它以作为一个服务运行。
安装Prometheus
安装和配置Prometheus
这是文章《如何在Ubuntu 20.04上使用Grafana和Prometheus监控MongoDB》的第2部分(共7部分)。
首先,您需要安装Prometheus。请登录到您的服务器,并按照以下步骤更新软件包列表:
sudo apt update接下来,您将为Prometheus创建配置和数据目录。要创建名为prometheus的配置目录,请执行以下命令:
sudo mkdir -p /etc/prometheus然后,创建数据目录:
sudo mkdir -p /var/lib/prometheus创建目录后,您将下载压缩的安装文件。Prometheus的安装文件以压缩包中的预编译二进制文件形式提供。要下载Prometheus,请访问其下载页面。
要下载2.31.0版本,请运行以下命令,并根据需要替换版本号:
wget https://github.com/prometheus/prometheus/releases/download/v2.31.0/prometheus-2.31.0.linux-amd64.tar.gz下载后,解压缩tarball文件:
tar -xvf prometheus-2.31.0.linux-amd64.tar.gz解压文件后,进入Prometheus文件夹:
cd prometheus-2.31.0.linux-amd64然后,将prometheus和promtool二进制文件移动到/usr/local/bin/目录中:
sudo mv prometheus promtool /usr/local/bin/接下来,您将把所有与Prometheus相关的文件移动到/etc/prometheus/目录。要移动consoles目录中的控制台文件和console_libraries目录中的库文件,请运行以下命令:
sudo mv consoles/ console_libraries/ /etc/prometheus/控制台和控制台库文件用于启动Prometheus图形用户界面。这些文件将与配置文件一起保存,以便在启动服务时使用。
最后,将prometheus.yml模板配置文件移动到/etc/prometheus/目录中:
sudo mv prometheus.yml /etc/prometheus/prometheus.ymlprometheus.yml是模板配置文件,您可以在此配置Prometheus的端口以及在启动服务时要使用的文件。
要检查安装的Prometheus版本,请运行以下命令:
prometheus --version您会收到类似于这样的输出:
prometheus, version 2.31.0 (branch: HEAD, revision: b41e0750abf5cc18d8233161560731de05199330) build user: root@0aa1b7fc430d build date: 20220714-15:13:18 go version: go1.18.4 platform: linux/amd64在本部分,您已成功安装Prometheus并验证了其版本。接下来,您将把它作为一项服务启动。
将Prometheus作为一项服务运行
配置Prometheus服务
既然您已经安装了Prometheus,现在需要将其配置为一个服务来运行。
在创建系统文件以实现此目标之前,您需要创建一个Prometheus组和用户。您需要一个对必要目录拥有所有者访问权限的专用用户。要创建一个prometheus组,请运行以下命令:
sudo groupadd --system prometheus接下来,创建一个Prometheus用户并将其分配给刚刚创建的Prometheus用户组。
sudo useradd -s /sbin/nologin --system -g prometheus prometheus更改目录的所有权和权限,以便专用用户具有正确的权限。
sudo chown -R prometheus:prometheus /etc/prometheus/ /var/lib/prometheus/
sudo chmod -R 775 /etc/prometheus/ /var/lib/prometheus/接下来,您将创建服务文件以将Prometheus作为一个服务运行。使用nano或您喜欢的文本编辑器,创建一个名为prometheus.service的systemd服务文件。
sudo nano /etc/systemd/system/prometheus.service添加以下代码行:
[Unit]
Description=Prometheus
Wants=network-online.target
After=network-online.target

[Service]
User=prometheus
Group=prometheus
Restart=always
Type=simple
ExecStart=/usr/local/bin/prometheus \
    --config.file=/etc/prometheus/prometheus.yml \
    --storage.tsdb.path=/var/lib/prometheus/ \
    --web.console.templates=/etc/prometheus/consoles \
    --web.console.libraries=/etc/prometheus/console_libraries \
    --web.listen-address=0.0.0.0:9090

[Install]
WantedBy=multi-user.target使用这段代码,您可以配置Prometheus使用ExecStart块中列出的文件来运行服务。服务文件告诉systemd以prometheus用户运行Prometheus,并使用配置文件/etc/prometheus/prometheus.yml,同时将数据存储在/var/lib/prometheus目录中。您还将Prometheus配置为在9090端口上运行。(systemd服务文件的详细信息超出了本教程的范围,但您可以在了解Systemd Units and Unit Files中了解更多信息。)
保存并关闭您的文件。如果使用nano,请按下CTRL+X,然后按Y。
现在,启动Prometheus服务。
sudo systemctl start prometheus设置Prometheus服务在启动时运行。
sudo systemctl enable prometheus您可以使用以下命令检查服务的状态:
sudo systemctl status prometheus输出将确认服务是否处于活动状态。
● prometheus.service - Prometheus
     Loaded: loaded (/etc/systemd/system/prometheus.service; enabled; vendor preset: enabled)
     Active: active (running) since Fri 2022-08-05 18:06:05 UTC; 13s ago
   Main PID: 7177 (prometheus)
      Tasks: 6 (limit: 527)
     Memory: 21.0M
     CGroup: /system.slice/prometheus.service
└─7177 /usr/local/bin/prometheus --config.file=/etc/prometheus/prometheus.yml --storage.tsdb.path=/var/lib/prometheus/ --web.console.template>要访问Prometheus,打开浏览器并访问您的服务器IP地址后接端口号9090:http://your_server_ip:9090。
注意:要访问Prometheus的Web控制台,您可能需要在服务器上允许9090端口。要检查当前的UFW规则集,请运行以下命令:sudo ufw status
如果9090端口还没有被允许,您可以使用以下命令来添加:sudo ufw allow 9090
您现在可以访问Prometheus网页控制台了。
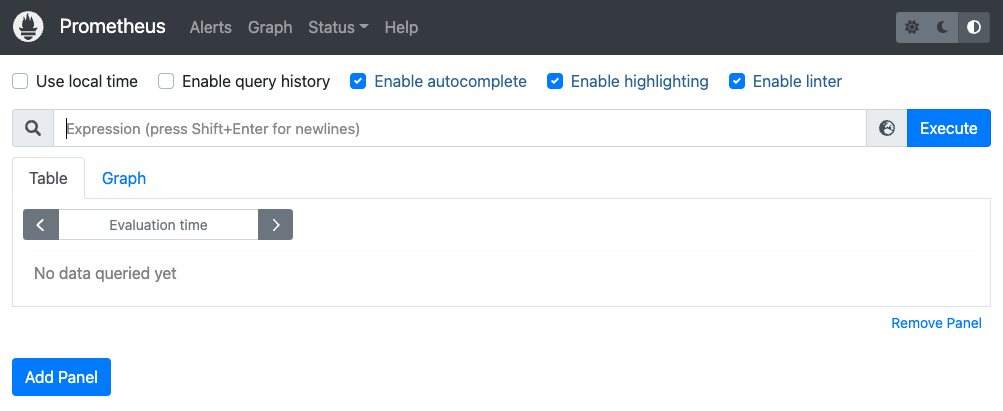
在这一步中,您安装了Prometheus并配置了它以作为一个服务运行。接下来,您将使用MongoDB导出器将您的MongoDB数据库绑定到Prometheus。
步骤2 — 配置MongoDB导出器
Prometheus通过抓取目标来收集指标数据。在此步骤中,您将安装并配置MongoDB导出器作为Prometheus的目标,使其可以从您的MongoDB实例中收集数据。
安装MongoDB导出器
安装MongoDB Exporter
在本节中,您将安装并配置MongoDB Exporter,它是Prometheus监控MongoDB的关键组件。首先,创建并进入一个专门用于Exporter的目录:
mkdir mongodb-exporter
cd mongodb-exporter
MongoDB Exporter可以从其GitHub仓库下载。它以二进制文件的形式打包在压缩文件中,您可以将其配置为系统服务运行。使用以下命令下载Exporter二进制文件:
wget https://github.com/percona/mongodb_exporter/releases/download/v0.7.1/mongodb_exporter-0.7.1.linux-amd64.tar.gz接下来,将下载的压缩文件解压到当前目录:
tar xvzf mongodb_exporter-0.7.1.linux-amd64.tar.gz最后,将解压出的mongodb_exporter二进制文件移动到系统路径/usr/local/bin/,以便系统可以识别并执行它:
sudo mv mongodb_exporter /usr/local/bin/至此,您已成功安装MongoDB Exporter。接下来,我们将配置MongoDB的身份验证并创建一个专用于监控的用户。
启用MongoDB身份验证并创建监控用户
在本节中,您将为MongoDB Exporter设置身份验证,并创建一个具有必要权限的用户来监控MongoDB集群的指标。
首先,连接到您的MongoDB实例:
mongo您将为Exporter创建一个具有clusterMonitor角色的管理员账户。切换到admin数据库:
use admin在admin数据库中,创建一个具有clusterMonitor角色的用户。请将<用户名>和<密码>替换为您实际希望使用的凭据:
db.createUser({
    user: "test",
    pwd: "testing",
    roles: [
        { role: "clusterMonitor", db: "admin" },
        { role: "read", db: "local" }
    ]
})
成功创建用户后,您将收到类似以下内容的输出:
Successfully added user: {
        "user" : "test",
        "roles" : [
                {
                        "role" : "clusterMonitor",
                        "db" : "admin"
                },
                {
                        "role" : "read",
                        "db" : "local"
                }
        ]
}
创建用户后,退出MongoDB shell:
exit接下来,使用您刚刚创建的用户名和密码设置MONGODB_URI环境变量:
export MONGODB_URI=mongodb://test:testing@localhost:27017请注意,27017是MongoDB实例的默认端口。设置此环境变量将使其优先于任何配置文件中存储的配置。
要验证MONGODB_URI环境变量是否已正确设置,请运行以下命令:
env | grep mongodb您将看到类似以下的输出,确认环境变量已设置:
MONGODB_URI=mongodb://mongodb_exporter:password@localhost:27017在本节中,您创建了一个具有clusterMonitor角色的MongoDB用户,该角色对于监控集群指标至关重要。接下来,您将配置MongoDB Exporter作为系统服务运行。
为MongoDB Exporter创建系统服务
在本节中,您将为MongoDB Exporter创建一个systemd服务文件,以便它可以作为系统服务自动启动和运行。
导航到/lib/systemd/system/目录,并使用nano或您偏好的文本编辑器创建一个名为mongodb_exporter.service的新服务文件:
cd /lib/systemd/system/
sudo nano mongodb_exporter.service
将以下配置内容粘贴到您刚刚创建的服务文件中:
这是文章《如何在Ubuntu 20.04上使用Grafana和Prometheus监控MongoDB》的第5部分(共7部分)。
[Unit]
Description=MongoDB Exporter
User=prometheus

[Service]
Type=simple
Restart=always
ExecStart=/usr/local/bin/mongodb_exporter

[Install]
WantedBy=multi-user.target
这个服务文件告诉Systemd在prometheus用户下将MongoDB导出器作为一个服务运行。ExecStart将从/usr/local/bin/运行mongodb_exporter二进制文件。了解更多关于Systemd服务文件的信息,请查看理解Systemd单元和单元文件。
保存并关闭您的文件。
接下来,重新加载Systemd守护进程以重新加载单元文件。
- sudo systemctl daemon-reload
现在,启动您的服务。
- sudo systemctl start mongodb_exporter.service
要检查MongoDB导出服务的状态,请运行以下命令:
- sudo systemctl status mongodb_exporter.service
输出结果将会确认该服务是正常运行的。
● mongodb_exporter.service - MongoDB Exporter
     Loaded: loaded (/lib/systemd/system/mongodb_exporter.service; disabled; vendor preset: enabled)
     Active: active (running) since Fri 2022-08-05 18:18:38 UTC; 1 weeks 3 days ago
   Main PID: 7352 (mongodb_exporte)
      Tasks: 5 (limit: 527)
     Memory: 14.2M
     CGroup: /system.slice/mongodb_exporter.service
             └─7352 /usr/local/bin/mongodb_exporter
为了确保一切按预期工作,请导航至项目根目录并在9216端口上运行curl命令,该端口是导出程序运行的位置。
- cd ~
- sudo curl http://localhost:9216/metrics
输出会很长,并且会包含类似于这样的行。
# HELP go_gc_duration_seconds GC调用持续时间的摘要。
# TYPE go_gc_duration_seconds summary
go_gc_duration_seconds{quantile=”0″} 0
go_gc_duration_seconds{quantile=”0.25″} 0
go_gc_duration_seconds{quantile=”0.5″} 0
go_gc_duration_seconds{quantile=”0.75″} 0
go_gc_duration_seconds{quantile=”1″} 0
go_gc_duration_seconds_sum 0
go_gc_duration_seconds_count 0
# HELP go_goroutines 当前存在的goroutine数量。
# TYPE go_goroutines gauge
go_goroutines 11
# HELP go_memstats_alloc_bytes 已分配且仍在使用的字节数。
# TYPE go_memstats_alloc_bytes gauge
go_memstats_alloc_bytes 1.253696e+06
# HELP go_memstats_alloc_bytes_total 已分配的总字节数,即使已释放。
# TYPE go_memstats_alloc_bytes_total counter
go_memstats_alloc_bytes_total 1.253696e+06
# HELP go_memstats_buck_hash_sys_bytes 剖析桶哈希表使用的字节数。
# TYPE go_memstats_buck_hash_sys_bytes gauge
go_memstats_buck_hash_sys_bytes 3054
# HELP go_memstats_frees_total 释放的总次数。
# TYPE go_memstats_frees_total counter
go_memstats_frees_total 2866
# HELP go_memstats_gc_sys_byte . . .
# HELP mongodb_asserts_total 断言文档报告了数据库上的断言数量。虽然断言错误通常不常见,但如果断言的值不为零,您应该检查mongod进程的日志文件以获取更多信息。在许多情况下,这些错误是微不足道的,但值得调查。
# TYPE mongodb_asserts_total counter
mongodb_asserts_total{type=”msg”} 0
mongodb_asserts_total{type=”regular”} 0
mongodb_asserts_total{type=”rollovers”} 0
mongodb_asserts_total{type=”user”} 19
mongodb_asserts_total{type=”warning”} 0
# HELP mongodb_connections 连接子文档数据,关于传入连接的当前状态和数据库服务器的可用性。使用这些值来评估服务器的当前负载和容量需求。
# TYPE mongodb_connections gauge
mongodb_connections{state=”available”} 51198
mongodb_connections{state=”current”} 2
# HELP mongodb_connections_metrics_created_total totalCreated提供了服务器创建的所有传入连接的计数。此数字包括已关闭的连接。
# TYPE mongodb_connections_metrics_created_total counter
mongodb_connections_metrics_created_total 6
# HELP mongodb_exporter_build_info 一个带有常量’1’值的指标,由构建mongodb_exporter的版本、修订、分支和go版本标记。
# TYPE mongodb_exporter_build_info gauge
mongodb_exporter_build_info{branch=”v0.7.1″,goversion=”go1.11.10″,revision=”3002738d50f689c8204f70f6cceb8150b98fa869″,version=”0.7.1″} 1
# HELP mongodb_exporter_last_scrape_duration_seconds 从MongoDB抓取指标的最后持续时间(秒)。
# TYPE mongodb_exporter_last_scrape_duration_seconds gauge
mongodb_exporter_last_scrape_duration_seconds 0.003641888
# HELP mongodb_exporter_last_scrape_error 从MongoDB抓取指标的最后一次是否导致错误(1表示错误,0表示成功)。
# TYPE mongodb_exporter_last_scrape_error gauge
mongodb_exporter_last_scrape_error 0
. . .
…
输出结果证实了MongoDB导出器正在收集指标,例如MongoDB版本、指标文档和连接详细信息。
在这一部分,您将MongoDB导出器配置为服务,并从MongoDB收集指标。接下来,您将把导出器配置为Prometheus的目标。
将MongoDB导出器配置为Prometheus目标
在这个部分中,您将把MongoDB导出器配置为Prometheus的目标。导航到保存您的Prometheus配置文件的目录中。
- cd /etc/prometheus/
使用Nano或您喜欢的文本编辑器,打开文件进行编辑:
- sudo nano prometheus.yml
将MongoDB导出器作为目标添加到您的文件中,只需将突出显示的行复制粘贴进去。
# 一个抓取配置,包含一个要抓取的端点:
# 这里是Prometheus本身。
scrape_configs:
  # 作业名称作为标签`job=<job_name>`添加到从该配置抓取的任何时间序列中。
  - job_name: "prometheus"
    static_configs:
            - targets: ["localhost:9090", "localhost:9216"]
MongoDB导出器的默认端口是9216。
保存并关闭您的文件。
在添加目标之后,重新启动Prometheus。
- sudo systemctl restart prometheus
请转到http://localhost:9090/targets以验证Prometheus是否正在抓取您新添加的导出器。
注意
注意:如果您正在使用远程服务器,请通过在浏览器中导航到http://your_server_ip:9090/targets来查看目标。您也可以使用端口转发在本地查看目标。为此,请在本地计算机上打开新的终端并输入以下命令:
ssh -L 9090:localhost:9090 your_non_root_user@your_server_ip连接到服务器后,请在本地计算机的Web浏览器中导航到http://localhost:9090/targets。您将能够访问一个Prometheus目标列表。
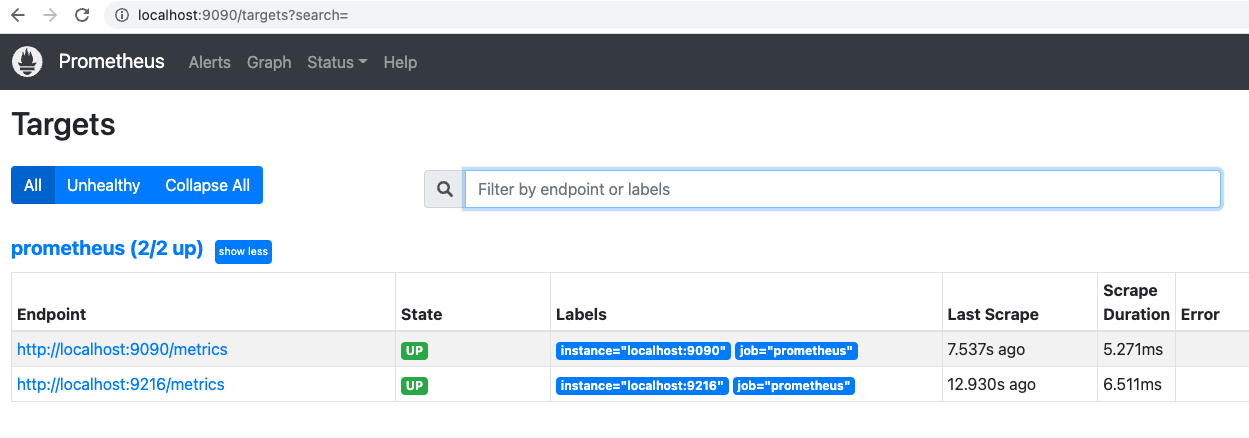
9090端点是Prometheus在进行自我抓取。9216端点是MongoDB导出器,可以确认您的配置正常工作。
在这一步中,您安装了MongoDB导出器,并将其配置为Prometheus的目标,以收集度量数据。接下来,您将在Grafana Web控制台中创建一个MongoDB仪表盘,用于查看和分析这些度量数据。
第三步 – 在Grafana中构建MongoDB仪表盘
在这一步中,您将构建一个仪表盘,用于在Grafana中可视化您的MongoDB数据。为了实现这一目标,您需要在Grafana中添加Prometheus作为数据源,并从Percona导入一个MongoDB仪表盘。Percona为MongoDB提供了多个仪表盘,您可以在Percona产品文档中找到。在本教程中,您将在Grafana实例中导入MongoDB概述仪表盘。首先,您将设置Prometheus作为Grafana的数据源。
作为先决条件的一部分,您已经安装并保护了Grafana。请在您的域名:3000上导航到您的Grafana实例,并使用您在先决条件中创建的凭据登录。
在左侧面板中,点击配置的齿轮图标,然后选择数据源。
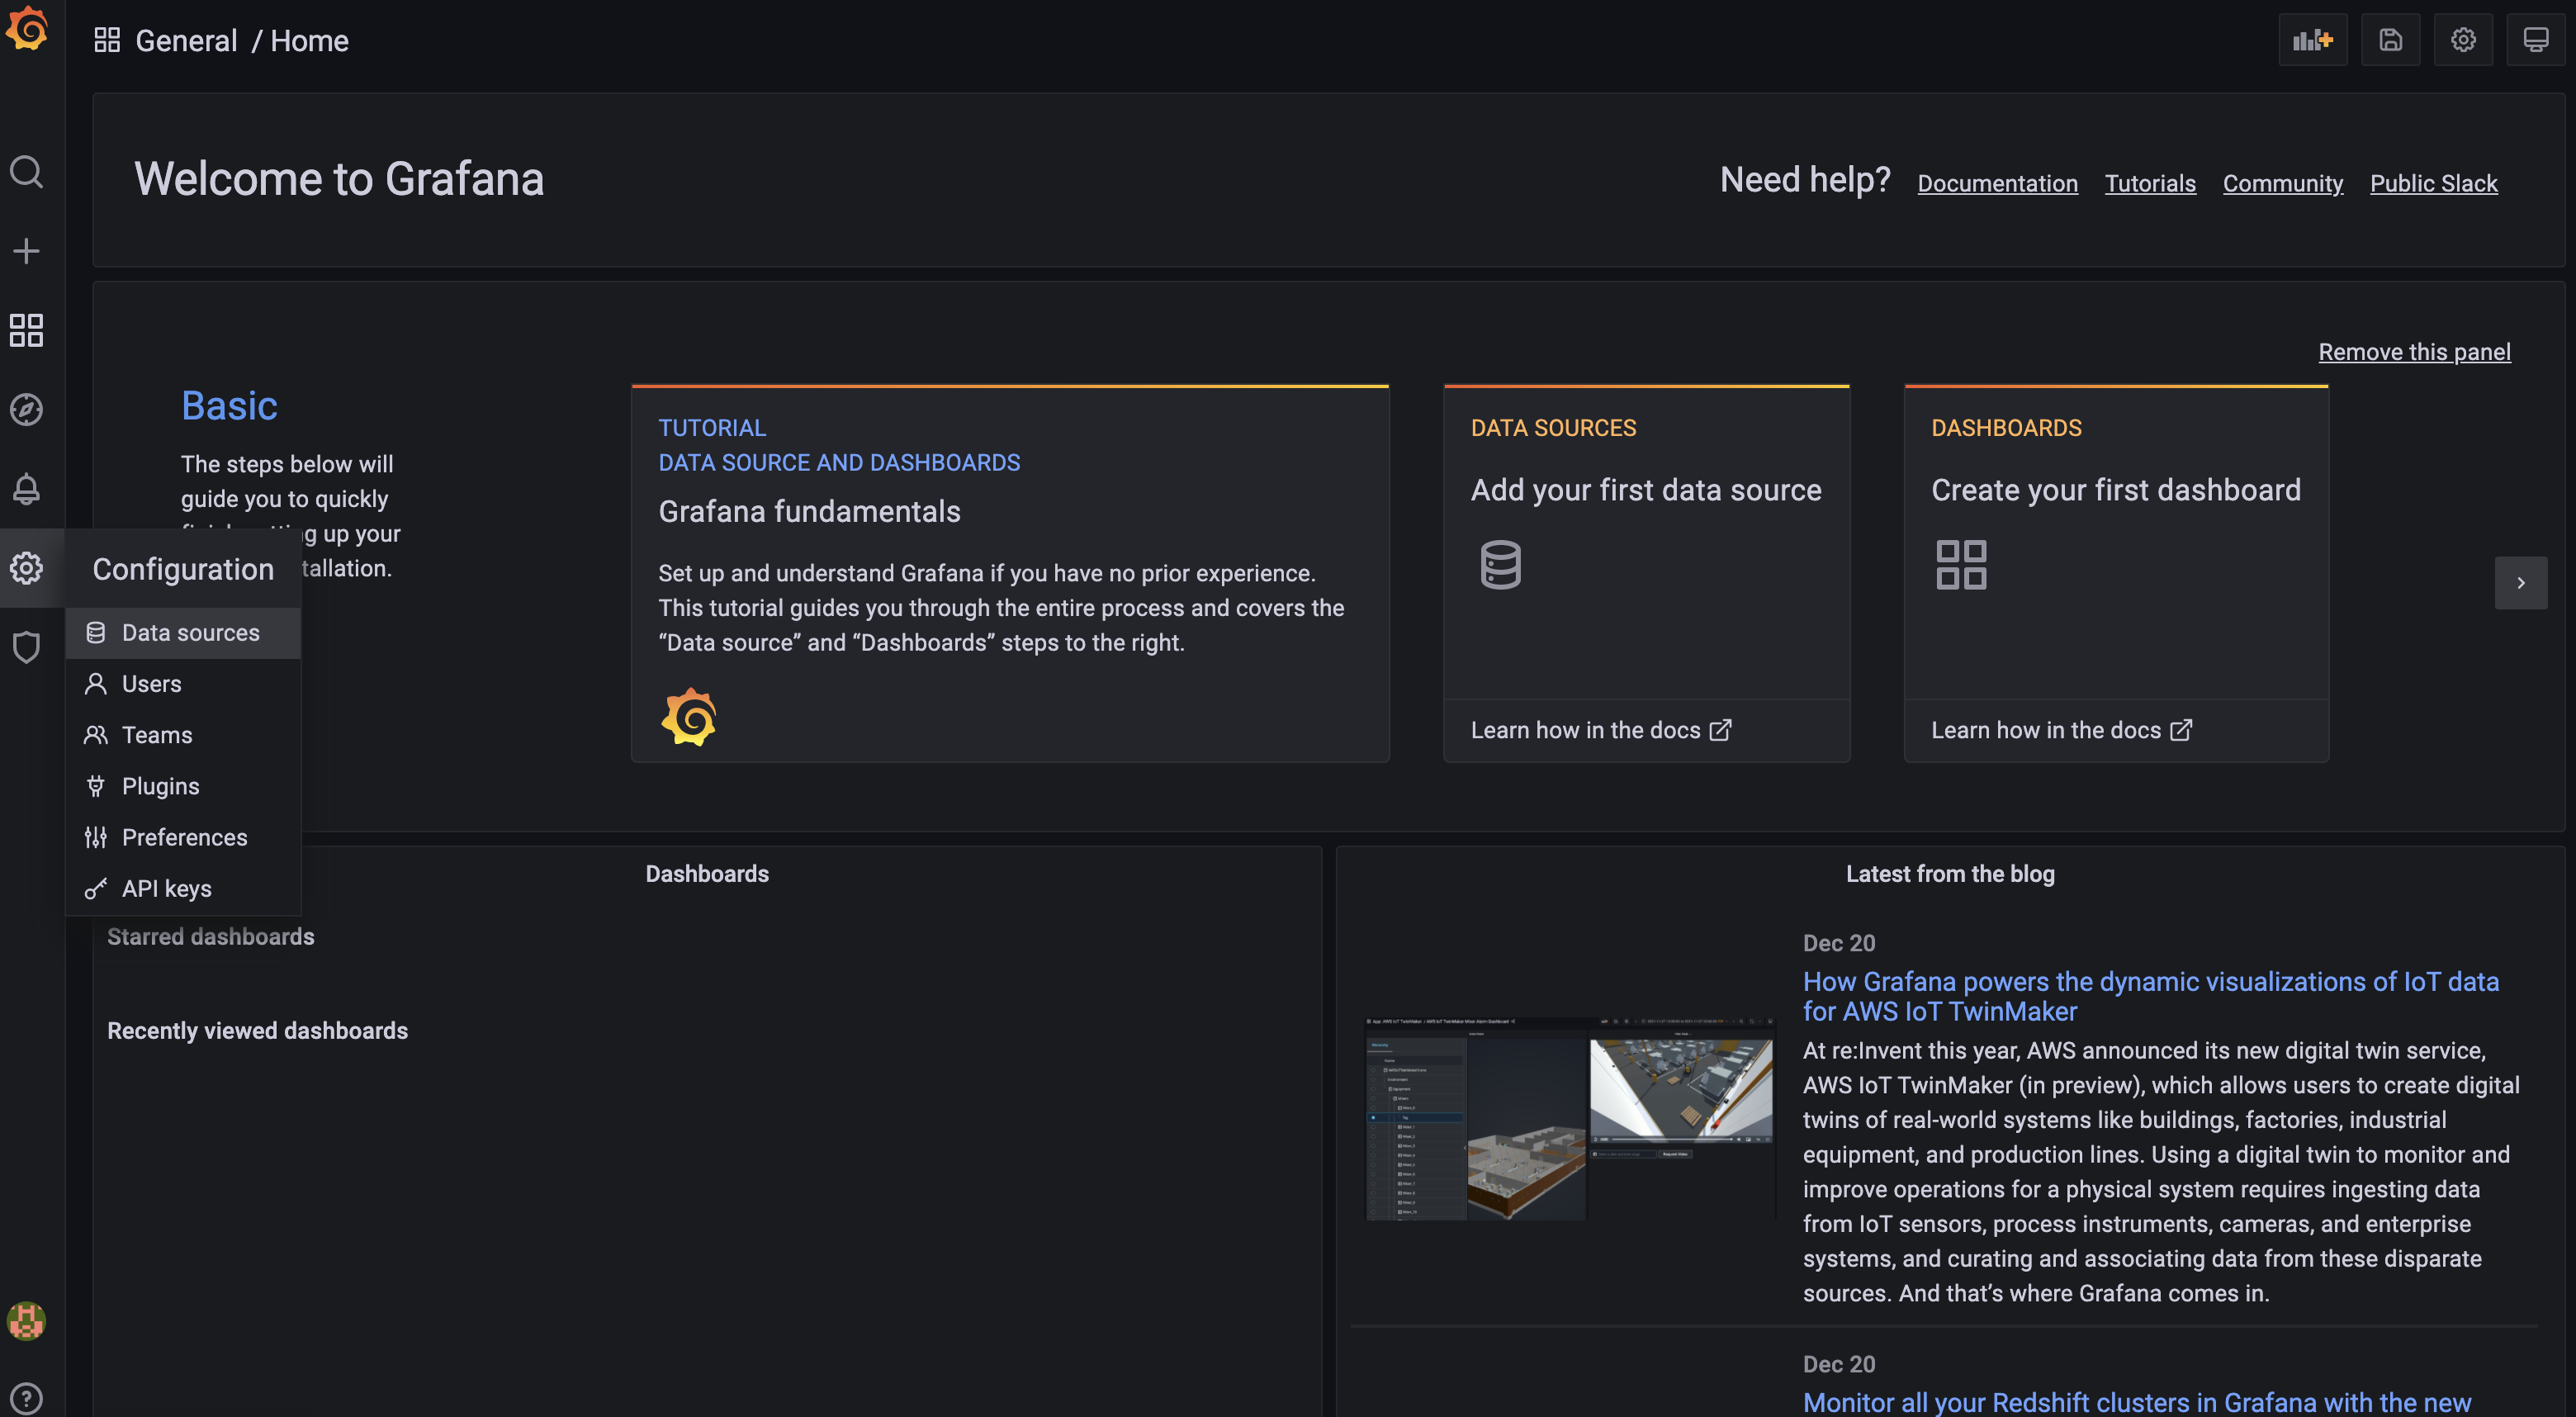
点击添加数据源。

然后选择Prometheus。
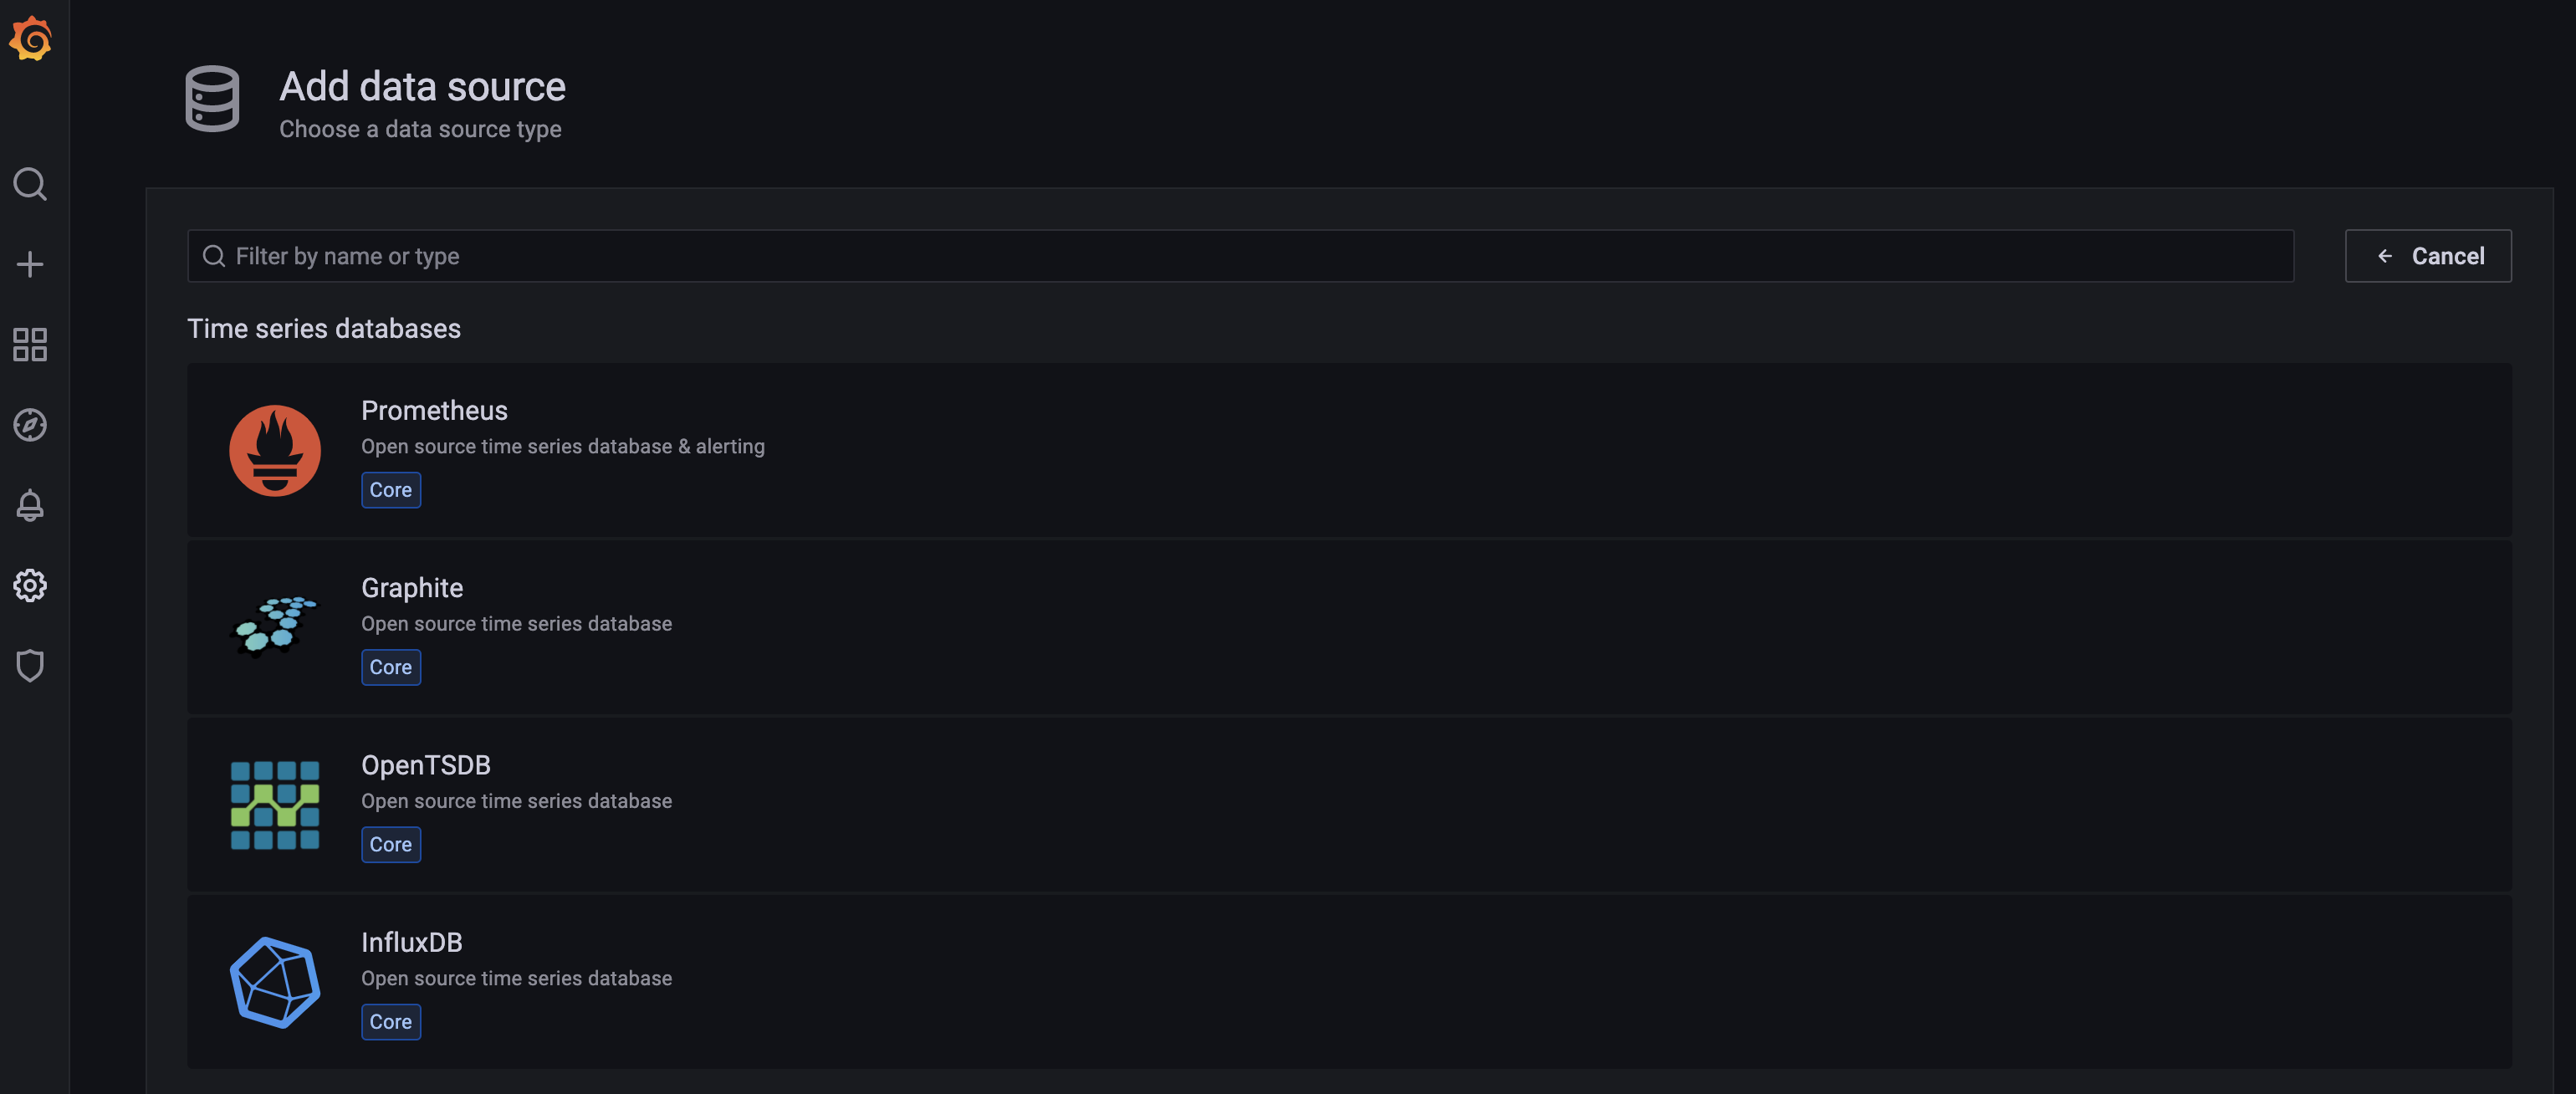
在接下来的屏幕上,您将配置Prometheus数据源的设置。
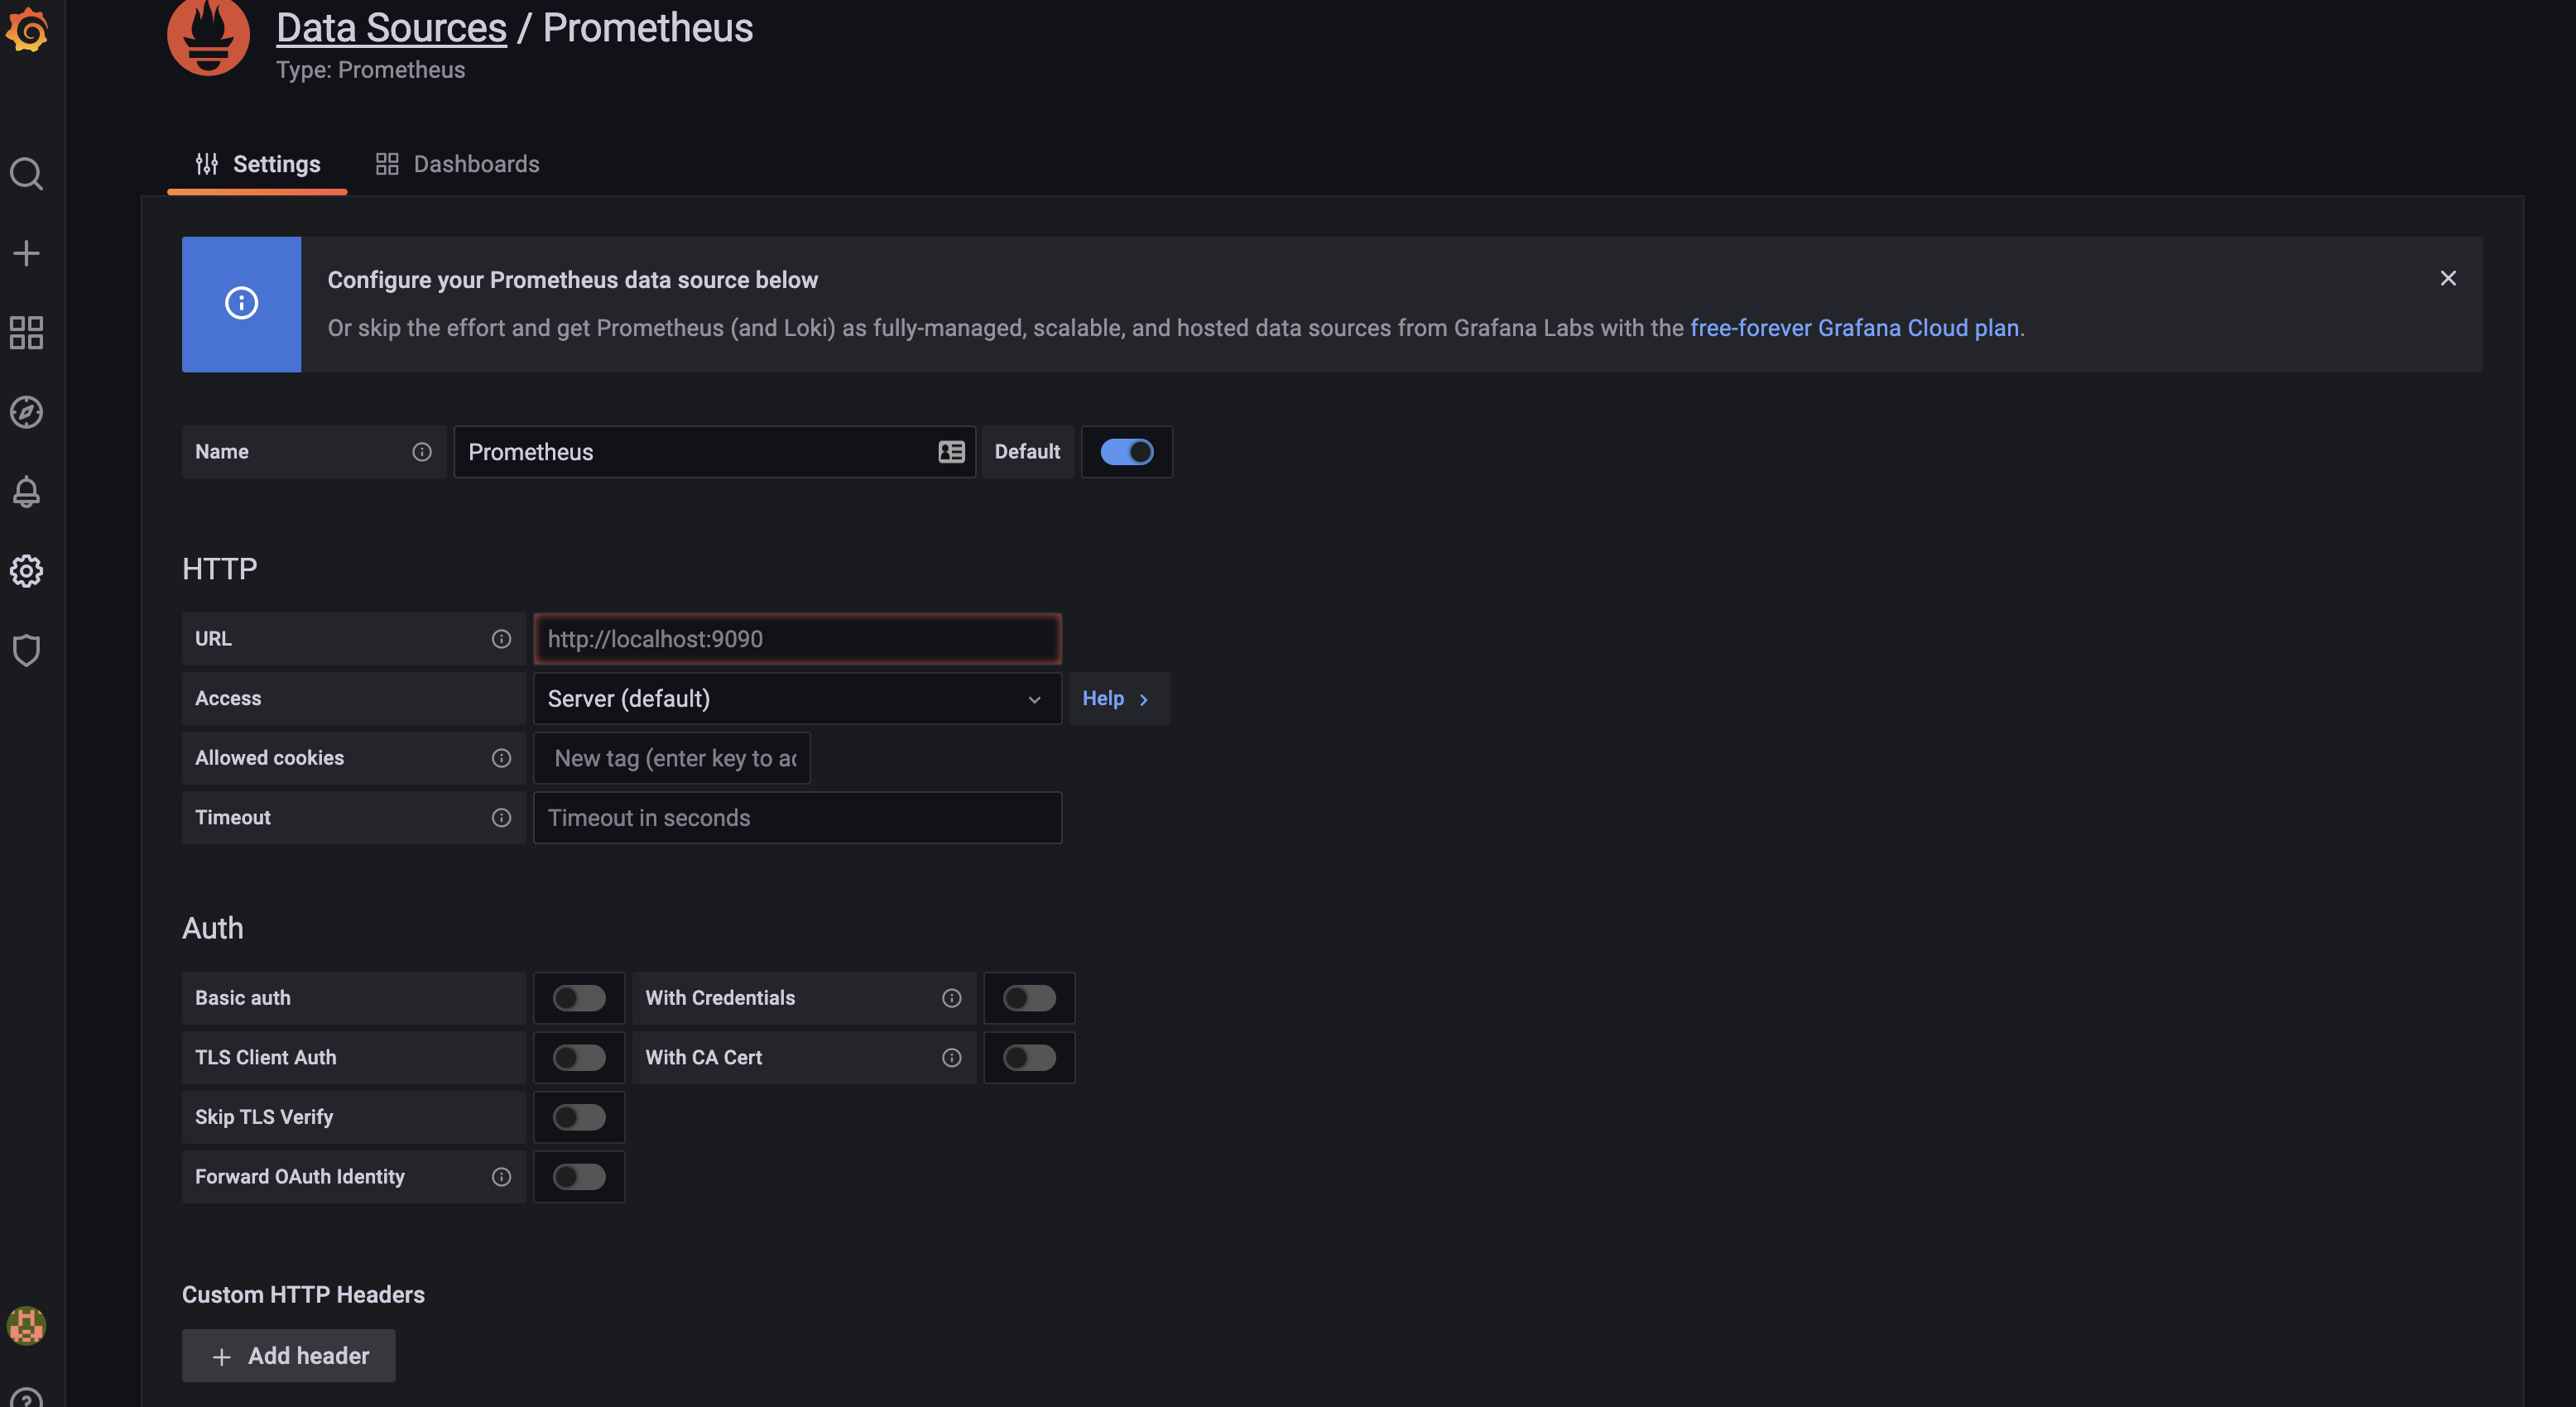
在URL栏中,提供您的Prometheus实例的URL:
http://your_server_ip:9090/点击屏幕底部的“保存并测试”按钮。现在,Prometheus已作为Grafana的数据源添加进去。
接下来,您将为Grafana导入MongoDB概览仪表盘。您可以通过上传JSON文件或导入仪表盘ID来导入仪表盘,仪表盘ID可以在Grafana产品文档中的仪表盘部分找到。在这里,您将使用仪表盘ID来导入仪表盘。
在左侧菜单中,点击创建的加号图标并选择导入。然后,您将进入到导入页面。

在这里,您可以上传仪表盘的JSON文件或粘贴Grafana仪表盘ID:
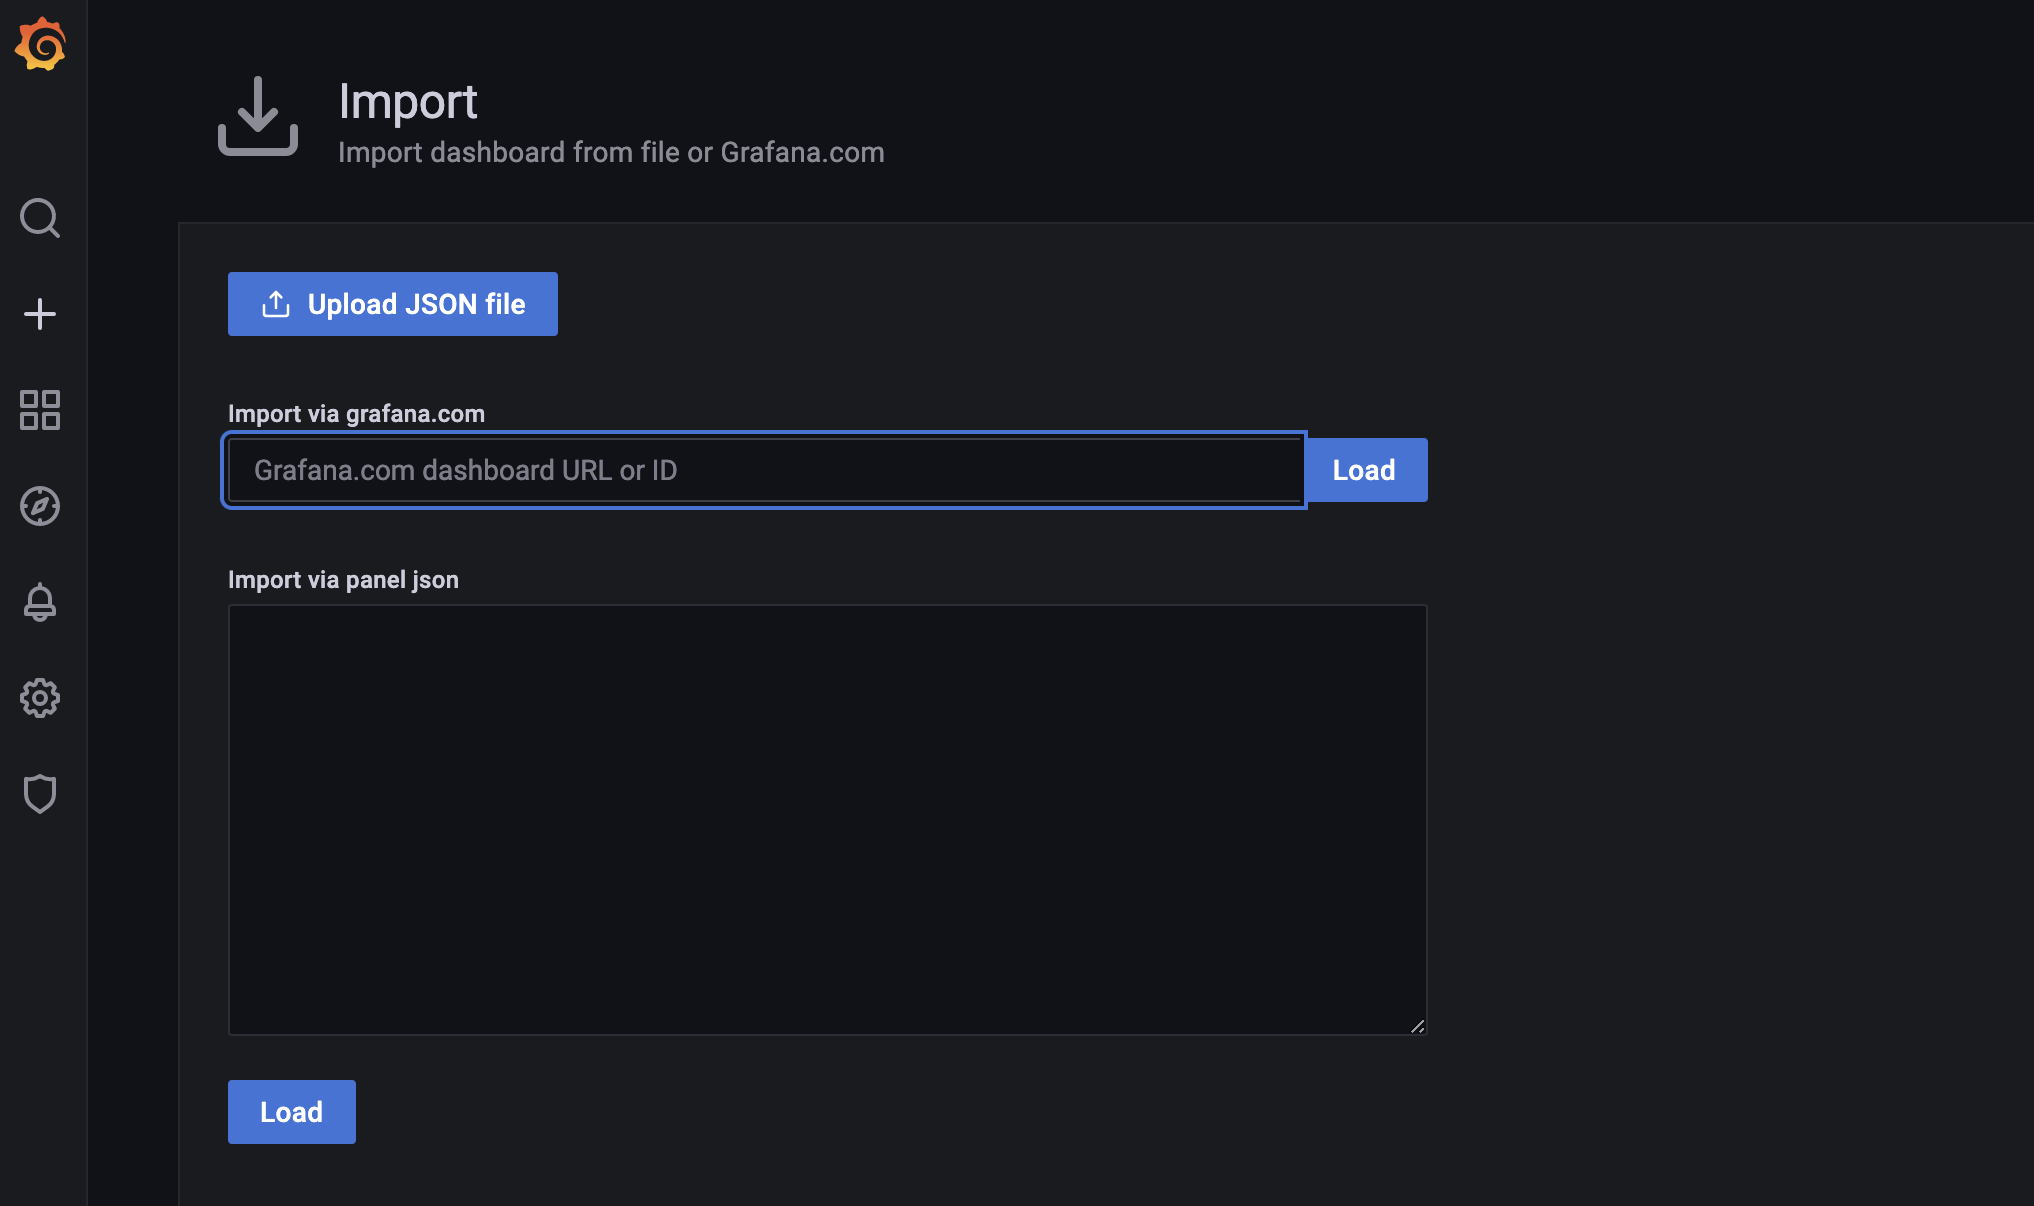
请添加Grafana仪表盘ID,在MongoDB概览仪表盘的Grafana页面上可以找到该ID。
https://grafana.com/grafana/dashboards/7353有许多仪表盘可用。您可以通过访问Grafana的仪表盘页面找到更多选项。
在添加仪表盘ID后,点击“加载”。
现在将打开一个选项页面,您可以为仪表盘提供名称,选择仪表盘所在的文件夹,并选择数据源。您可以将仪表盘和文件夹名称保留为默认设置。对于数据源,请选择Prometheus。一旦填写完选项,点击导入按钮。
仪表盘将被创建。
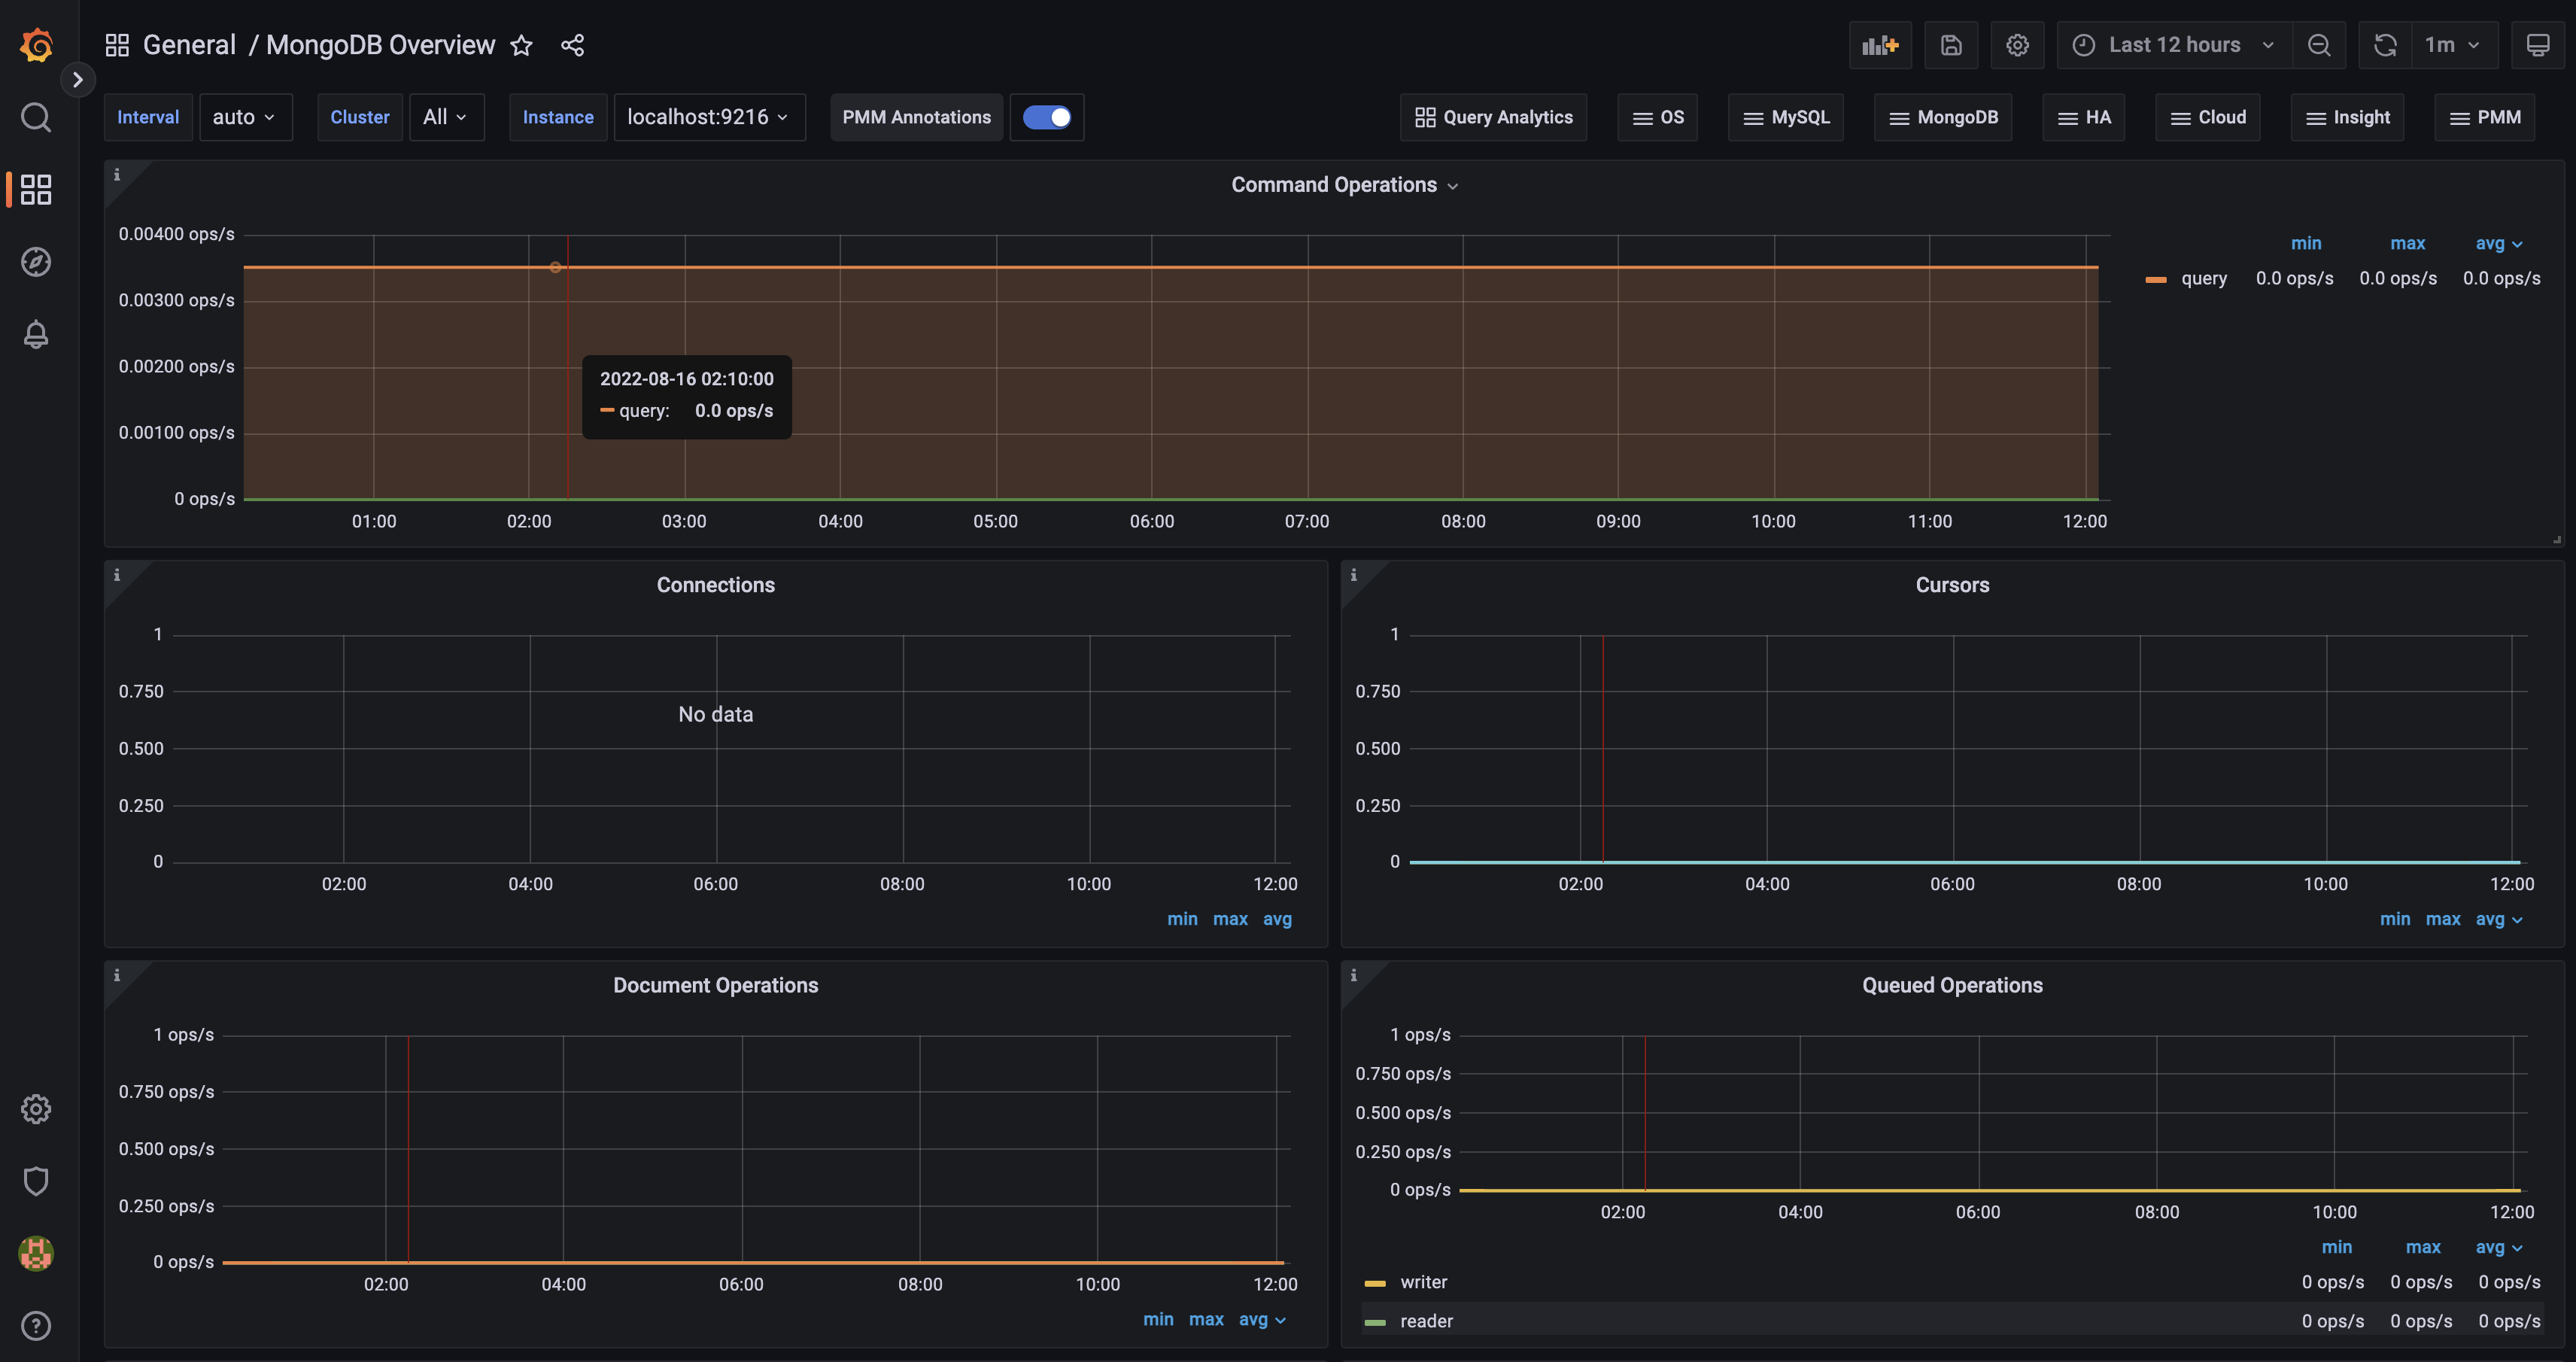
您的仪表盘将显示MongoDB数据库的实时更新,包括命令操作、连接、游标、文档操作和排队操作。(欲了解更多详细信息,请查阅Percona提供的MongoDB概览仪表盘文档。)
结论
在本文中,您创建了一个Grafana仪表盘,用于监控MongoDB数据库的Prometheus指标,从而可以通过GUI仪表盘监控数据库。首先,您安装了Prometheus并配置了MongoDB导出器。然后,您将Prometheus作为数据源添加到Grafana中,从而可以监控和可视化来自MongoDB实例的数据。
现在您已经有了一个完全操作的MongoDB监控流水线,您可以深入挖掘一下。为了开始,尝试在Grafana中探索额外的仪表盘。
要了解更多有关MongoDB的内容,请查看我们的《如何使用MongoDB管理数据》教程系列。
想要快速建立一个完全可用的数据库环境,请考虑查看Silicon Cloud的MongoDB托管数据库服务。

